📑 Table of Contents ▶
- Japanese Tamagoyaki
- Mastering Japanese Tamagoyaki
- Fundamentals
- Preparation/setup
- Crafting the Perfect Tamagoyaki
- Technique
- Tips/tricks
- Perfecting Your Tamagoyaki
- Perfecting results
- Troubleshooting/variations
- Serving and Enjoying Tamagoyaki
- Serving/presentation
- Pairings/storage
- Conclusion
- FAQs – Japanese Tamagoyaki
I believe that a good recipe has the power to bring people together, spark joy, and turn ordinary moments into cherished memories. My love for cooking started long before I ever picked up a cookbook. I was raised in a home where the kitchen was the heart of everything. The clatter of pots, the smell of herbs simmering, and the warmth of shared meals are some of my earliest and fondest memories.
My grandmother was my biggest inspiration—she didn’t need fancy ingredients or complicated techniques to make magic happen. Her meals were a reflection of care, patience, and creativity. Watching her cook taught me that food is more than sustenance—it’s a language of love. Those moments planted the seed that would eventually grow into Yumoti.
Yumoti was born out of a deep desire to make cooking feel less intimidating and more joyful. I know how it feels to stand in the kitchen, unsure where to begin or how to turn scattered ingredients into something special. I also know the pride that comes with cooking a meal your loved ones truly enjoy.
So I created this platform not just to share recipes but to build confidence and excitement around everyday cooking. Whether you’re a beginner learning your way around the stove, a busy parent looking for quick meal ideas, or an experienced home chef in search of fresh inspiration—Yumoti is for you.
Print
Japanese Tamagoyaki
- Prep Time: 15 minutes
- Cook Time: 30 minutes
- Total Time: 45 minutes
- Yield: 1 serving
- Category: Main Course
- Method: Frying
- Cuisine: Japanese
Description
Learn how to make delicious Japanese Tamagoyaki with our step-by-step recipe guide. Perfect for breakfast or as a side dish, this traditional Japanese omelette is a must-try!
Ingredients
- 3 large eggs (50 g each w/o shell) (180 ml)
- 3 Tbsp dashi (Japanese soup stock) (45 ml)
- 2 tsp sugar (10 g)
- 1 tsp soy sauce (5 ml) (use GF soy sauce for gluten-free)
- 1 tsp mirin (5 ml)
- 2 pinches sea salt
- 2 Tbsp vegetable oil (30 ml)
- 1 1/2 sheets nori (dried laver seaweed) (optional; see Method 2 below)
- 3 oz beef radish (85 g) (1 inch, 2.5 cm; use the sweeter, greenish part near the top)
- soy sauce
Instructions
- Before you begin, it’s important to note that this particular version of tamagoyaki is quite tricky due to its runny consistency. If you’re unfamiliar with making tamagoyaki, consider practicing with a simpler version first. Gather all the necessary items.
- In a bowl, lightly beat the three large eggs. Use chopsticks to make zig-zag cuts through the eggs; avoid overmixing them.
- In a separate container, blend the dashi, sugar, soy sauce, mirin, and sea salt. Stir until well combined.
- Carefully incorporate the seasoning blend into the eggs, mixing gently. Transfer this mixture into a spouted measuring cup for easier pouring into a pan.
- Warm the pan over medium heat. Soak a folded paper towel in vegetable oil and lightly coat the pan with the oil. Test the pan’s heat by adding a drop of the egg mixture; it should sizzle if ready.
- Pour a thin layer of the egg mixture into the pan, tilting to ensure even coverage.
- Pop any air pockets that form. Once the base sets but the top remains soft, begin rolling the egg into a log from one side to the opposite, moving towards the handle.
- Shift the rolled egg to the starting side of the pan, then apply more oil with the paper towel, even underneath the roll.
- Add another thin layer of the egg mixture to cover the pan’s base. Lift the rolled egg to allow the mixture to spread beneath it.
- As the new layer sets but remains soft on top, roll it again from one side to the other.
- Repeat moving the rolled egg to the starting side and oil the pan, including beneath the roll.
- Introduce another thin layer of the egg mixture, ensuring it covers the base and beneath the roll.
- Continue rolling once the egg layer has set but is still soft. Repeat the process for a total of six rounds, maintaining a log shape.
- Optionally, lightly brown the omelette. Once done, transfer it onto a bamboo sushi mat and roll it to hold its form. Let it rest for five minutes.
- Reheat the pan over medium. Oil the pan using a paper towel dipped in vegetable oil. Verify readiness with a test drop of the egg mix. Pour a thin layer to cover the pan, tilting it to distribute evenly.
- Release any trapped air bubbles. Start rolling the egg into a log from one side to the other, optionally adding a nori sheet before rolling.
- Shift the roll to the starting side, oil the pan again, and pour a thin layer of the egg mix, ensuring it spreads beneath the roll.
- Once the new layer sets, continue rolling, optionally adding another nori sheet before rolling.
- Repeat rolling and oiling until all the egg mixture is used up.
- Place the finished omelette on a bamboo mat and roll it up to set its shape. Allow it to cool for five minutes.
- Cut the omelette into half-inch slices.
- Peel and grate the beef radish, then gently squeeze out excess moisture. Place it in a dish and drizzle with soy sauce, serving it alongside the tamagoyaki.
- Store the tamagoyaki in an airtight container in the freezer for up to two weeks. Thaw in the fridge overnight or microwave when ready to eat.
Notes
- Consider using homemade dashi stock for a richer flavor profile.
- Opt for a higher-quality mirin to enhance the sweetness of the tamagoyaki.
- To achieve a firmer texture, reduce the amount of dashi in the recipe.
Mastering Japanese Tamagoyaki
Fundamentals
Japanese Tamagoyaki is a delightful dish that embodies simplicity and elegance. It requires a few basic ingredients like eggs, dashi, sugar, soy sauce, and mirin, yet the result is a complex, layered omelette that is both savory and slightly sweet. The essence of Japanese gyoza can also be appreciated alongside tamagoyaki, offering a rich culinary experience.
The key to a perfect Japanese Tamagoyaki lies in the balance of flavors and the technique of rolling the omelette. Each layer should be thin and evenly cooked, creating a delicate texture that melts in your mouth. The ingredients in this dish are carefully selected to achieve this balance, with dashi providing a subtle umami flavor.
For those who appreciate Japanese cuisine, tamagoyaki serves as a versatile dish. It can be enjoyed on its own or as part of a larger meal, much like onigiri rice balls or Japanese mounjaro.
Preparation/setup
Gather all the necessary ingredients and tools before you begin. You will need three large eggs, dashi, sugar, soy sauce, mirin, sea salt, and vegetable oil. Optionally, include nori sheets for added flavor. A well-seasoned rectangular pan is ideal for achieving the authentic shape of a tamagoyaki.
Start by lightly beating the eggs in a bowl. Use chopsticks to make zig-zag cuts through the eggs, ensuring they are mixed without being overbeaten. In a separate container, blend the dashi, sugar, soy sauce, mirin, and sea salt until well combined. Then, incorporate this seasoning blend into the eggs gently.
Transfer the egg mixture into a spouted measuring cup for easier pouring. This will help you control the flow of the mixture into the pan, ensuring each layer is thin and even. A smooth preparation process will set you up for success when it comes to cooking the tamagoyaki.
Crafting the Perfect Tamagoyaki
Technique
Mastering the technique of making tamagoyaki involves patience and precision. Heat the pan over medium heat and use a paper towel soaked in vegetable oil to coat the pan lightly. Test the pan’s heat by adding a drop of the egg mixture; it should sizzle if ready.
Pour a thin layer of the egg mixture into the pan, tilting it for even coverage. Pop any air pockets that form. Once the base sets but the top remains soft, begin rolling the egg into a log from one side to the opposite, moving towards the handle.
Shift the rolled egg to the starting side of the pan, then apply more oil with the paper towel, even underneath the roll. Add another thin layer of the egg mixture to cover the pan’s base. Lift the rolled egg to allow the mixture to spread beneath it. Repeat this process to create multiple layers.
Japanese Tamagoyaki
Tips/tricks
Consistency is key when making tamagoyaki. Maintain a steady heat to prevent the eggs from cooking too quickly or burning. Use a gentle hand when rolling the omelette to keep the layers intact. If you’re new to this technique, practice with smaller batches until you gain confidence.
For a creative twist, consider incorporating nori sheets between layers. This adds a subtle seaweed flavor and enhances the visual appeal of the dish. If you enjoy experimenting with flavors, try Japanese egg sandwiches as another delightful option.
Remember to adjust the seasoning to your taste. The sweetness from the sugar and the umami from the dashi should complement each other, creating a harmonious blend. With practice, you will develop a personal touch that makes your tamagoyaki unique.
Perfecting Your Tamagoyaki
Perfecting results
Achieving the perfect tamagoyaki requires attention to detail in every step. Each roll should be firm yet tender, with layers that are distinct but cohesive. The final product should be a beautifully layered omelette, lightly browned on the outside with a soft, moist interior.
After rolling, transfer the omelette onto a bamboo sushi mat and roll it to hold its form. Let it rest for five minutes to set the shape. This step is crucial for achieving the characteristic log shape of tamagoyaki.
For an added touch, consider lightly browning the omelette before the final roll. This enhances the flavor and gives the tamagoyaki a pleasing golden hue. If you appreciate intricate Japanese dishes, you might also enjoy Japanese castella cupcakes.
Troubleshooting/variations
If your tamagoyaki falls apart during rolling, check that the layers are setting properly before rolling. Adjusting the heat and ensuring even coverage of the egg mixture can help prevent this issue. Practice makes perfect, so don’t be discouraged by initial attempts.
For variations, consider adding finely chopped vegetables or herbs to the egg mixture. These additions can enhance the flavor and nutrition of the dish. Experiment with different fillings to find your favorite combination.
Remember, the beauty of Japanese tamagoyaki lies in its simplicity and adaptability. With each attempt, you will refine your technique and develop a version that suits your personal taste.
Serving and Enjoying Tamagoyaki
Serving/presentation
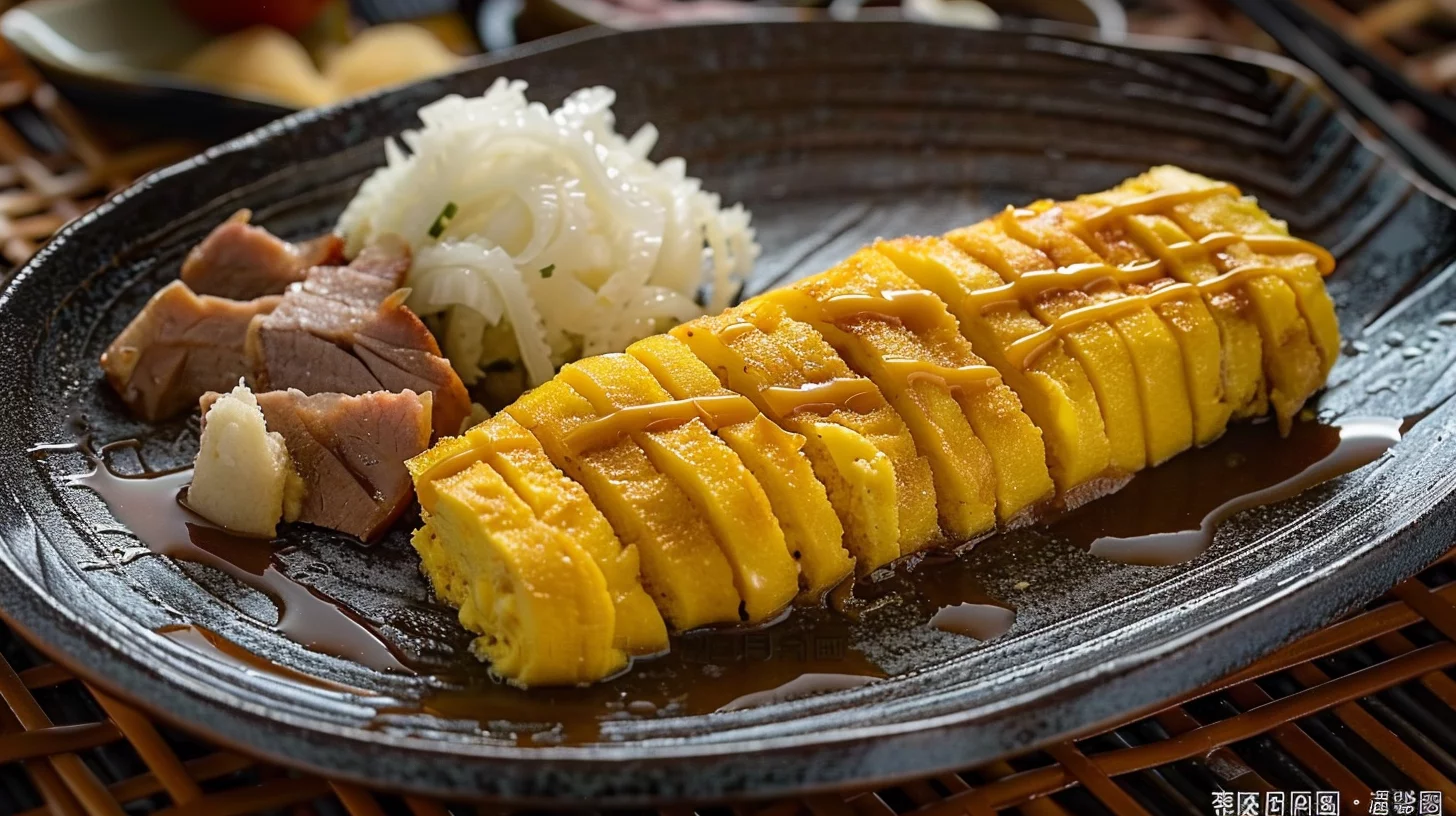
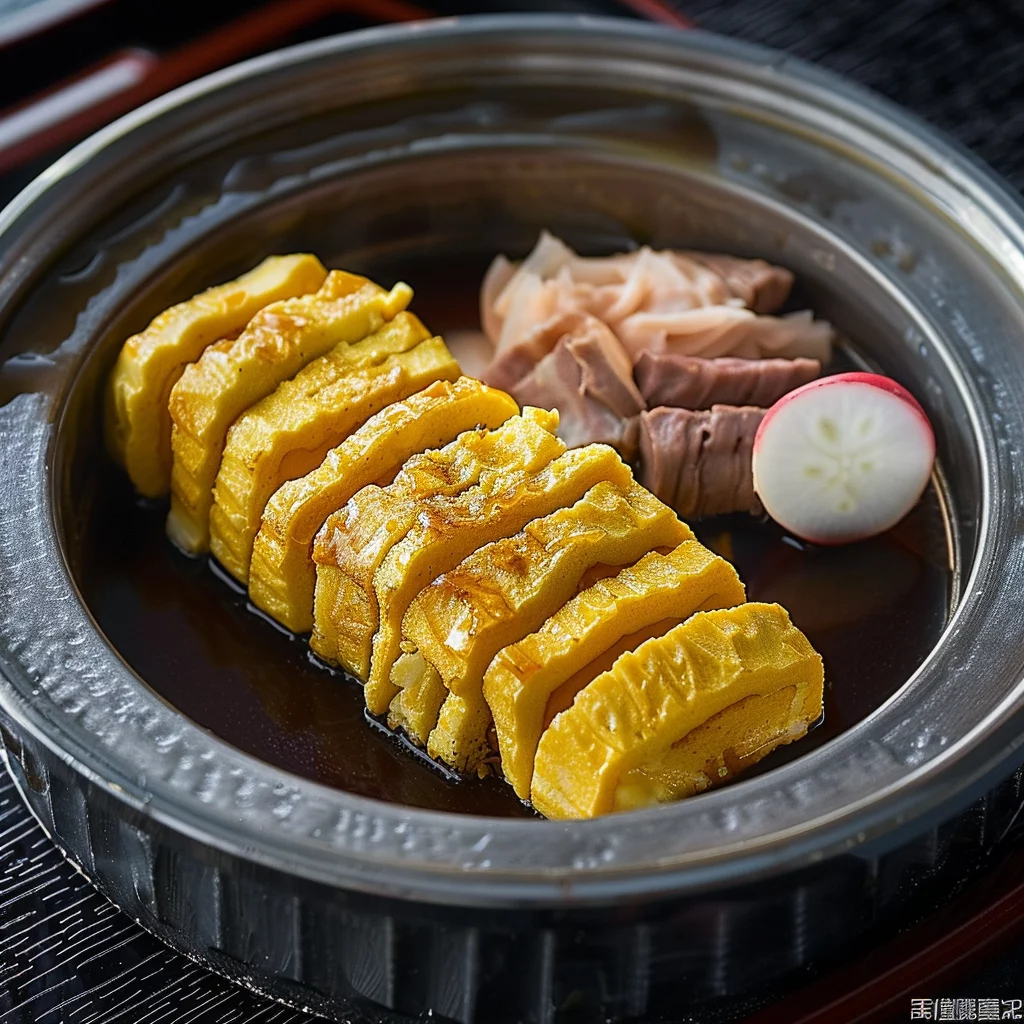
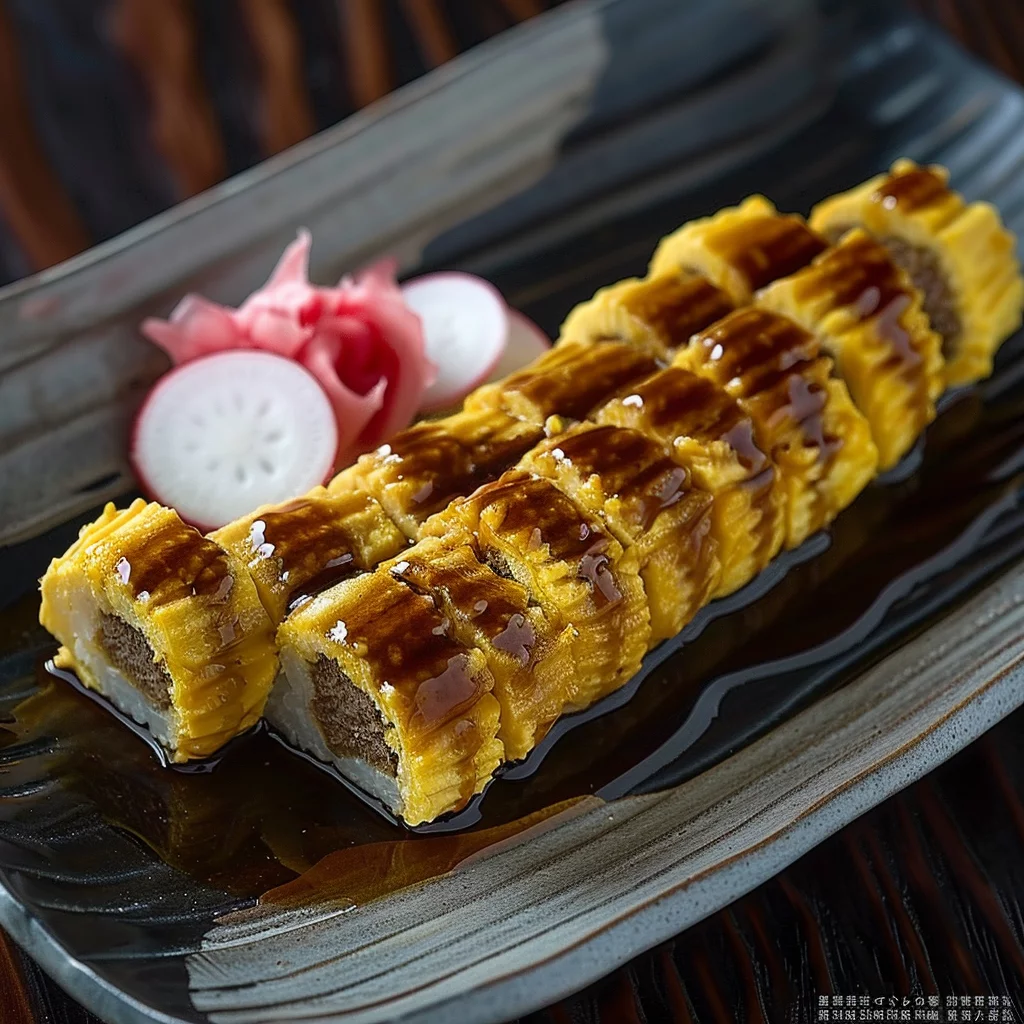
Serve your tamagoyaki by slicing it into half-inch pieces. This reveals the beautiful layers and makes it easy to enjoy. Arrange the slices on a decorative plate for a visually appealing presentation that highlights your culinary skills.
For a traditional touch, serve tamagoyaki with soy sauce-drizzled grated beef radish on the side. This pairing adds a refreshing element to the dish, balancing the richness of the eggs. If you love exploring Japanese flavors, try pairing it with dishes like Japanese chicken katsu curry.
Presentation is an integral part of Japanese cuisine. Take care in arranging your tamagoyaki slices to showcase the delicate layers. This attention to detail enhances the dining experience, making each bite a celebration of flavors and textures.
Japanese Tamagoyaki
Pairings/storage
Japanese tamagoyaki pairs well with a variety of side dishes. Consider serving it alongside a fresh salad or a bowl of steaming rice for a balanced meal. For those who enjoy a hearty meal, homemade Japanese ramen bowls make an excellent accompaniment.
To store tamagoyaki, place it in an airtight container and freeze it for up to two weeks. Thaw it in the refrigerator overnight or use a microwave when ready to eat. This makes it a convenient option for meal prep or a quick snack.
The versatility of tamagoyaki allows it to fit seamlessly into various meal settings. Whether as a breakfast dish, a lunchbox item, or a dinner side, it offers a taste of Japan that can be enjoyed anytime.
Conclusion
Making Japanese tamagoyaki is a rewarding endeavor that combines technique and flavor. With practice, you can master the art of creating this elegant omelette. Its simplicity and versatility make it a staple in Japanese cuisine and a favorite among food enthusiasts worldwide.
The strengths of tamagoyaki lie in its delicate layers and balanced flavors. Whether enjoyed on its own or as part of a larger meal, it offers a delightful experience that celebrates the essence of Japanese cooking. Embrace the joy of creating this dish and savor the moments it brings to your table.
