
📑 Table of Contents ▶
Starbucks Copycat Chocolate Cake Pops
A favorite treat from childhood reignited my love for baking. Whenever I visited a local café, I always found myself drawn to those delightful chocolate cake pops. Their rich, smooth chocolate coating and soft, moist interiors spark joy that few things can match. Recreating those tasty bites at home has become a passion of mine, and now, I want to share my version of those Starbucks-inspired chocolate cake pops.
The delightful process of making these cake pops takes you back to the essence of joyful moments spent baking. I remember gathering with friends and family in the kitchen, measuring flour, cracking eggs, and mixing batters. The energy in the air filled with laughter and anticipation created beautiful memories around each dessert made. With these chocolate cake pops, you can replicate that experience and create your own special moments.
Using simple ingredients, these cake pops allow for creativity and customization. The flavor pairs perfectly with a variety of sweets and drinks. You’ll discover that crafting these chocolate cake pops brings not just treats, but cherished memories. Let’s dive into how to create these delectable bites together.
The Art of Crafting Chocolate Cake Pops
Fundamentals
Making chocolate cake pops may sound intimidating, but it’s straightforward and fun. Start with a lovely cake base and build upon it. Ensure that the cake bakes evenly for the best texture. You can use any chocolate cake recipe you enjoy or a box mix for convenience. The secret lies in creating the perfect cake pop consistency; it should be moldable yet not too dense.
When preparing for this adventure, gather your tools and ingredients. You’ll need cake, icing or frosting, chocolate melts for coating, and sticks to give your pops that iconic look. Keep everything within reach to make the process smooth.
Preparation/Setup
Begin by baking the chocolate cake according to your recipe or the box instruction. Allow it to cool completely before moving to the next step. This cooling period is crucial for achieving the right texture in your cake pops.
Next, crumble the cooled cake into a large bowl. Use your hands or a fork to create fine crumbs. Gradually incorporate the icing or frosting. Aim for a consistency that allows you to form compact balls without them falling apart.
Once you’ve achieved the right texture, roll the mixture into small balls, about 1 inch in diameter. Place these cake balls on a baking sheet lined with parchment paper. Make sure they have some space between them. After forming all the balls, refrigerate them for 30 minutes to firm up.
Ingredients
- 1 chocolate cake (baked and cooled)
- 1 cup frosting (chocolate or vanilla)
- 2 cups chocolate melts (dark or milk chocolate)
- Lollipop sticks or cake pop sticks
- Decorative sprinkles or toppings
Directions
- Crumble the cooled chocolate cake into a large bowl, mixing in the frosting until well combined.
- Roll the mixture into balls, about 1 inch in diameter, and place them on a baking sheet lined with parchment paper.
- Refrigerate the cake balls for at least 30 minutes.
- While the cake balls chill, melt the chocolate melts in a microwave-safe bowl, stirring until smooth.
- Dip the end of each lollipop stick into the melted chocolate and insert it into a cake ball. This step helps secure the stick in place.
- Dip each cake pop into the melted chocolate, allowing excess chocolate to drip off.
- Optionally, coat the chocolate with sprinkles or other toppings while the chocolate is still wet.
- Place the cake pops upright in a foam or a stand, allowing them to set completely.

Mastering the Technique for Cake Pops
Technique
Perfecting the skill of making cake pops involves practice and attention to detail. Keep a few tips in mind for optimal results. The most important technique includes ensuring the cake is completely cooled before crumbling it. Warm cake creates a soggy mixture that won’t hold its shape.
When shaping the cake balls, don’t pack them too tightly. Gently roll them to maintain a light texture, which results in a moist cake pop. Choose high-quality chocolate melts for the coating. The right ingredients enhance flavor and texture, creating a decadent bite.
Tips/Tricks
- Chill Before Dipping: Return the formed cake balls to the refrigerator after shaping them. Chilling them again helps prevent them from sinking in the melted chocolate.
- Use a Candy Melting Pot: If available, a candy melting pot keeps the chocolate at the ideal temperature for dipping.
- Experiment with Flavors: Try different combinations of cake and frosting flavors to create a variety of cake pops that appeal to diverse tastes.
- Keep it Clean: Maintain cleanliness between dipping and decorating to avoid a messy kitchen. Having some paper towels or a clean area handy helps manage the chocolate drips.
Perfecting Your Chocolate Cake Pops
Perfecting Results
Achieving perfection takes some trial and error. Each step has its nuances. For example, during the coating process, ensure a smooth dip. This step is essential for an appealing appearance and crunchy texture.
If you notice the coating doesn’t adhere well, you might have overlooked chilling the cake balls or used the wrong chocolate. Perfect the technique of dipping by using a dipping fork or skewer to allow for an even coating.
Troubleshooting/Variations
If your cake pops crack, consider two adjustments: allow the chocolate to cool slightly before dipping or ensure the cake balls are adequately chilled. Small adjustments can make a significant difference in achieving flawless cake pops.
Also, variations can spice things up. Try adding a layer of flavored chocolate on top, like caramel or white chocolate, and adjust your sprinkles for a seasonal touch. Think about holiday-themed cake pops with colored coatings and festive decorations.
Presenting and Storing Cake Pops
Serving/Presentation
Present these cake pops as a delightful treat for any occasion. They shine at birthday parties, baby showers, or even as a sweet surprise for a casual gathering. Utilize decorative stands or place them in treat bags for individual servings.
Consider arranging them on a platter with festive decorations, or use themed sticks and wrappers to match your event’s decor. Utilize colors and textures that complement the cake pop design to create appealing presentations.
Pairings/Storage
Accompany your cake pops with a selection of other sweet treats, such as cookies or brownies, to create a dessert spread. Serve alongside refreshing beverages like milk, hot chocolate, or coffee for a delightful pairing that enhances the indulgent experience.
Store leftover cake pops in an airtight container at room temperature for up to a week. For longer storage, consider placing them in the refrigerator or even freezing them for future enjoyment. Thaw frozen pops at room temperature before serving.
Creating Starbucks-inspired chocolate cake pops becomes a rewarding experience filled with flavor and creativity. Embrace the opportunity to craft unique treats that bring people together, sparking joy similar to those treasured moments spent back in the kitchen.
Print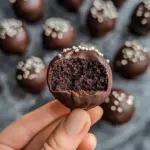
Starbucks Copycat Chocolate Cake Pops
- Prep Time: 30 minutes
- Cook Time: 30 minutes
- Total Time: 60 minutes
- Yield: 20 servings
- Category: Dessert
- Method: Baking
- Cuisine: American
- Diet: Vegetarian
Description
Delightful chocolate cake pops inspired by Starbucks, perfect for recreating joyful moments in the kitchen.
Ingredients
- 1 chocolate cake (baked and cooled)
- 1 cup frosting (chocolate or vanilla)
- 2 cups chocolate melts (dark or milk chocolate)
- Lollipop sticks or cake pop sticks
- Decorative sprinkles or toppings
Instructions
- Crumble the cooled chocolate cake into a large bowl, mixing in the frosting until well combined.
- Roll the mixture into balls, about 1 inch in diameter, and place them on a baking sheet lined with parchment paper.
- Refrigerate the cake balls for at least 30 minutes.
- While the cake balls chill, melt the chocolate melts in a microwave-safe bowl, stirring until smooth.
- Dip the end of each lollipop stick into the melted chocolate and insert it into a cake ball to secure the stick in place.
- Dip each cake pop into the melted chocolate, allowing excess chocolate to drip off.
- Optionally, coat the chocolate with sprinkles or other toppings while the chocolate is still wet.
- Place the cake pops upright in foam or a stand, allowing them to set completely.
Notes
Chill the cake balls again before dipping to prevent them from sinking in the chocolate. Use high-quality chocolate melts for best results.
