📑 Table of Contents ▶
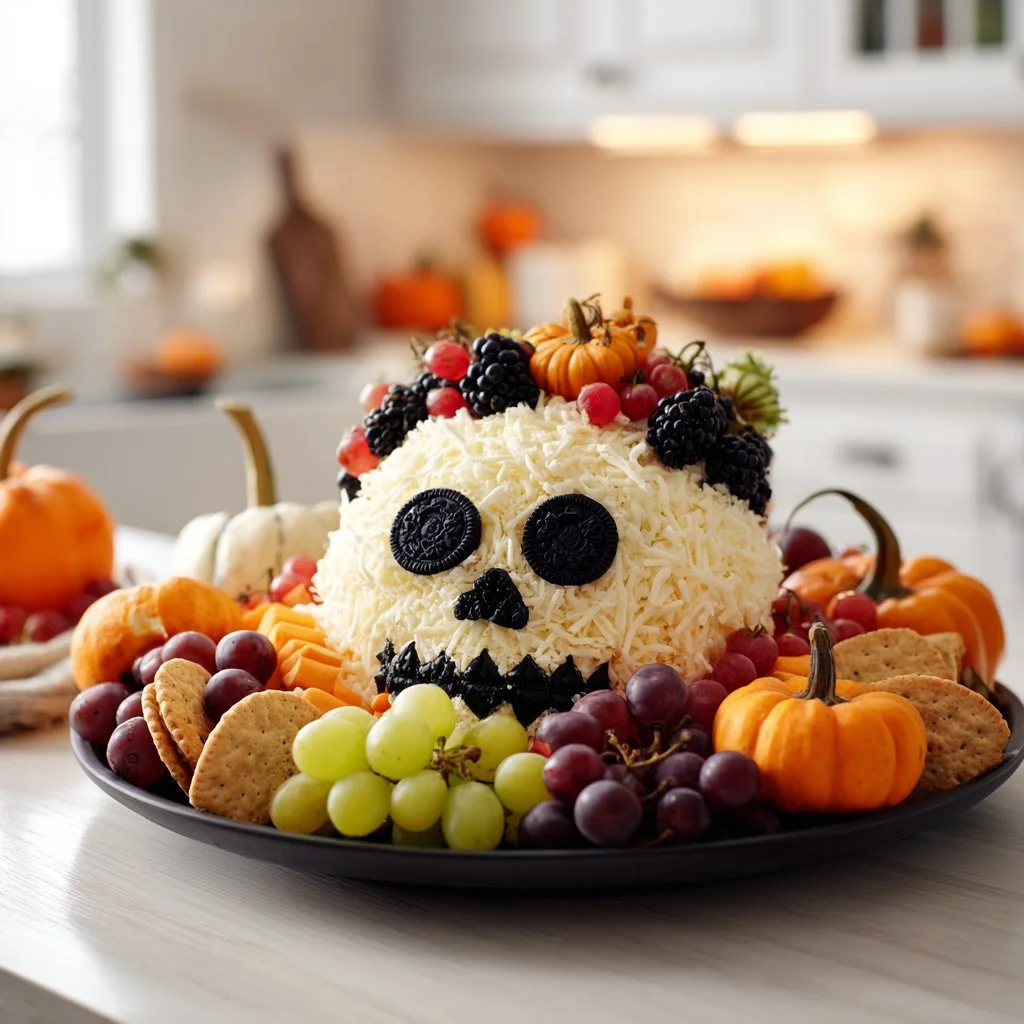
Skellington Cheese Ball Appetizer Recipe
Creating memorable moments starts with a fantastic recipe. The anticipation of gathering friends and family for Halloween festivities makes me eager to whip up delightful treats. One recipe that never fails to impress is the Skellington Cheese Ball. This fun appetizer not only dazzles in presentation but also packs a punch in flavor.
The blend of creamy cheeses and savory spices transforms an ordinary dish into something magical. I remember the first time I made this cheese ball. Everyone gathered around, eyes lit with excitement. The combination of cream cheese and white cheddar creates a velvety base, while garlic and onion powders elevate the flavor profile. As I shaped the mixture into a ball, my kids raced around, excitement palpable as they helped decorate it with black olives, creating Skellington’s memorable features.
Using the freshest ingredients truly makes a difference, and this recipe showcases the magic that can happen when simple elements come together. The Skellington Cheese Ball not only serves as a delicious treat but also as a centerpiece, reminding everyone that great food can bring us together in laughter and joy.
Skellington Cheese Ball Essentials
Fundamentals
The Skellington Cheese Ball appetizer consists of straightforward yet high-impact ingredients. The foundation lies in the cream cheese and shredded white cheddar cheese, contributing to a creamy, rich texture that melts in your mouth. The garlic powder and onion powder add depth and warmth, giving every bite a burst of flavor. Finally, the black olives bring both a pop of color and a playful element, perfect for Halloween festivities.
Choosing the best ingredients makes a huge difference in the final product. Fresh cream cheese and quality cheddar transform the cheese ball from bland to delectable. This dish enhances any gathering, celebrating the season with flavor and fun.
Preparation/Setup
Preparing the Skellington Cheese Ball is simple, and the process adds to the enjoyment. Begin by gathering all your ingredients and tools. You’ll need a mixing bowl, plastic wrap, and a platter for serving. Ensure the cream cheese is softened to make mixing effortless.
Before you start, set aside some creative time. The shaping and decorating stages encourage playful imagination. Children love participating, making it an excellent family activity. The anticipation builds as the cheese ball chills, and everyone eagerly awaits the final reveal.
Ingredients
To create the Skellington Cheese Ball, gather the following ingredients:
- 2 cups cream cheese (softened)
- 2 cups shredded white cheddar cheese
- 1 teaspoon garlic powder
- 1 teaspoon onion powder
- 1/2 teaspoon black pepper
- Black olives (for decoration)
Each component plays a vital role in ensuring the success of this appetizer. The combination of cream cheese and white cheddar delivers rich creaminess. The garlic and onion powders harmonize beautifully for extra flavor. And of course, the black olives are essential for bringing Skellington’s features to life!
Directions
Making the Skellington Cheese Ball is quick and straightforward. Start by mixing the softened cream cheese and shredded white cheddar cheese in a bowl until you achieve a smooth consistency. The blending of the cheeses is vital, ensuring that everything sticks together seamlessly.
Next, add the garlic powder, onion powder, and black pepper. Mix well to incorporate all ingredients evenly. Once combined, shape the mixture into a ball, covering any cracks or blemishes that might show when presenting the cheese ball.
Wrap the cheese ball in plastic wrap and chill it in the refrigerator for at least one hour. This chilling step is key! It allows the cheese ball to firm up, making it easier to work with when decorating.
After an hour, it’s time to unleash your creativity. Using black olives, create Skellington’s eyes, nose, and mouth. Place the decorated cheese ball on a platter, showcasing your spooky creation for all to admire!
Creative Techniques for a Fun Presentation
Technique
The Skellington Cheese Ball appetizer becomes a showstopper when presented with flair. The technique you use while shaping and decorating the cheese ball can really enhance its overall appeal.
After chilling, remove the cheese ball from the refrigerator. Shape it gently or mold it further to ensure it takes on the desired appearance. Use a knife to smooth out the surface if necessary. Then, utilize your olive pieces wisely, arranging them carefully to portray Skellington’s mischievous grin.
Tips/Tricks
Add your personal touch during the decorating phase! You can modify the design based on your guests or kitchen-theme. For example, using sliced vegetable pieces can offer an alternative approach. A bit of creativity with the olives allows for a fun and unique presentation each time you serve this dish.
Even while preparing the cheese ball, consider adding herbs or spices to suit your preferences. Feel free to experiment lightly without compromising the core flavors. Softened cream cheese is forgiving, allowing for easy adjustments.
Perfectly Crafting the Skellington Cheese Ball
Perfecting Results
Perfecting the Skellington Cheese Ball comes with practice. After a few attempts, you’ll find your rhythm in preparation, mixing, and decorating. Each time, you can refine your technique.
A tip to keep in mind: Ensure your cream cheese is softened properly. This step directly impacts the texture and consistency of your final product. If it’s too cold, mixing becomes a tedious task.
Troubleshooting/Variations
If you find your cheese ball doesn’t hold its shape after chilling, simply try mixing in a bit more cheese or adjust the proportions slightly. No big deal!
Moreover, if you aim for more flavor, consider enhancing the cheese ball with additional spices or herbs. Fresh chives or parsley can provide an appealing contrast to the angle of creaminess. Don’t hesitate to substitute or add ingredients based on your taste.
Adjustments can create a distinct twist on this classic recipe, ensuring you delight returning guests with unique flavor profiles!
Presentation & Enjoyment Options
Serving/Presentation
Presentation transforms any dish from ordinary to extraordinary. With Skellington Cheese Ball, serving it on a festive platter garnished with assorted crackers or veggie sticks makes it visually appealing.
Consider adorning the backdrop of the serving area with Halloween-themed decor. Your cheese ball will shine in the spotlight, charming all party-goers.
Pairings/Storage
When it comes to enjoying the Skellington Cheese Ball, pairing it with various snacks enhances the experience. Offer a selection of crunchy crackers or sliced veggies for dipping. These options encourage guests to indulge while enjoying that fantastic cheese flavor.
Storing the leftover cheese ball is simple. If there’s any left, wrap it tightly and keep it in the fridge for 3-5 days. The flavors continue to meld, making for a delightful treat anytime!
Creating the Skellington Cheese Ball appetizer for your next gathering invites fun and laughter into your culinary world. Embrace the spirit of creativity, and let this dish become an integral part of your festive celebrations.
Print
Skellington Cheese Ball Appetizer
- Prep Time: 15 minutes
- Cook Time: 0 minutes
- Total Time: 60 minutes
- Yield: 8 servings
- Category: Appetizer
- Method: No Cooking Required
- Cuisine: American
- Diet: Vegetarian
Description
A delightful and fun cheese ball that dazzles in presentation and flavor, perfect for Halloween festivities.
Ingredients
- 2 cups cream cheese (softened)
- 2 cups shredded white cheddar cheese
- 1 teaspoon garlic powder
- 1 teaspoon onion powder
- 1/2 teaspoon black pepper
- Black olives (for decoration)
Instructions
- In a mixing bowl, combine softened cream cheese and shredded white cheddar cheese until smooth.
- Add garlic powder, onion powder, and black pepper; mix well.
- Shape the mixture into a ball, covering any cracks.
- Wrap in plastic wrap and refrigerate for at least one hour.
- After chilling, decorate with black olives to create Skellington’s features.
- Serve on a platter for a spooky presentation.
Notes
Store leftovers wrapped tightly in the refrigerator for 3-5 days. Consider experimenting with additional spices or herbs for flavor variations.
