📑 Table of Contents ▶
- Rustic Skillet Apple Pie
- Crafting the Perfect Rustic Skillet Apple Pie
- Fundamentals
- Preparation/setup
- Mastering the Technique
- Technique
- Tips/tricks
- Perfecting Your Rustic Skillet Apple Pie
- Perfecting results
- Troubleshooting/variations
- Serving and Storing Your Rustic Delight
- Serving/presentation
- Pairings/storage
- Conclusion
- FAQs – Rustic Skillet Apple Pie
A steaming slice of rustic skillet apple pie takes me back to my grandmother’s cozy kitchen, where love was baked into every dish. The rustic charm of this pie captures the essence of homey comfort, reminiscent of those cherished family gatherings filled with laughter and the sweet aroma of cinnamon-kissed apples. I remember watching her effortlessly transform simple ingredients into a dessert that managed to bring everyone together at the table.
My culinary journey began in that kitchen, surrounded by the warmth of shared meals and the comforting clatter of pots. The skillet apple pie, with its flaky crust and luscious apple filling, became a family favorite, a testament to my grandmother’s belief that food was more than just nourishment—it was a language of love. Every time I recreate this rustic dessert, I feel a connection to those roots, a reminder of the joy that simple, well-loved recipes can bring.
This rustic skillet apple pie isn’t just a dessert; it’s a slice of tradition, an invitation to gather around and create new memories. The combination of Granny Smith and Braeburn apples, enveloped in a buttery crust, brings a balance of tartness and sweetness that delights the senses. As we delve into this recipe, let’s embrace the simplicity and soulfulness that make rustic skillet apple pie a timeless classic.
Rustic Skillet Apple Pie
- Prep Time: 20 minutes
- Cook Time: 60-70 minutes
- Total Time: 80-90 minutes
- Yield: 1 pie
- Category: Dessert
- Method: Baking
- Cuisine: American
Description
Discover how to make a delicious Rustic Skillet Apple Pie with our easy-to-follow recipe. Perfect for any occasion, this dessert will be a crowd-pleaser!
Ingredients
- 2 lbs (907 g) Granny Smith apples, peeled, cored, & sliced
- 2 lbs (907 g) Braeburn apples or similar cooking apple
- 1 tsp (5 ml) ground cinnamon
- 3/4 cup (150 g) sugar
- 1/2 cup (113 g) vegetable oil
- 1 cup (200 g) brown sugar (dark or light)
- 2 pie crusts (homemade or store-bought rolled crust)
- 1 egg white
- 2 tbsp (25 g) sugar (white sugar or turbinado)
Instructions
- Warm up the oven to 350°F and position a baking tray on the lower rack to catch any overflow from the pie.
- In a 10-inch cast-iron skillet, heat the vegetable oil over medium warmth. Add the brown sugar and stir continuously for 1 to 2 minutes until it melts. Take the skillet off the heat and allow the mixture to cool while you prepare the apples.
- Remove the skin and cores from the apples, then slice them into wedges about 1/2-inch thick. Mix the apple slices with the ground cinnamon and 3/4 cup of the sugar.
- Lay one pie crust into the skillet on top of the brown sugar blend. Evenly spread the apple mixture over this crust, then cover with the second pie crust. Gently tuck the edges downwards along the sides.
- Beat the egg white with a splash of water until it becomes frothy. Use a pastry brush to coat the top pie crust with this mixture, then sprinkle with 2 tablespoons of sugar. Make 4 or 5 slits in the top to let steam escape.
- Place the pie in the oven and let it bake for 60 to 70 minutes, or until it turns golden brown and bubbly. If needed, cover with foil in the last 10 minutes to avoid over-browning.
- Let the pie sit on a wire rack for 30 minutes before you serve it.
Notes
- Try enhancing the apple mixture with dried cranberries or chopped pecans for a unique flavor and texture.
- Create a decorative crust by using cookie cutters to make shapes from the leftover pie crust dough before placing it on top.
- Opt for a lattice crust instead of a full top crust for a more rustic appearance by weaving strips of pie crust dough over the apple filling.
Crafting the Perfect Rustic Skillet Apple Pie
Fundamentals
Creating a rustic skillet apple pie starts with understanding the fundamentals of this classic dessert. The choice of apples is crucial; Granny Smith and Braeburn varieties provide the perfect mix of tartness and sweetness. Their firm texture withstands the baking process, ensuring your pie has a delightful bite.
The pie crust acts as the foundation, cradling the luscious apple filling. Whether you opt for homemade or store-bought, ensure it’s rolled out evenly to avoid any uneven baking. The use of a cast-iron skillet not only adds a rustic charm but also promotes even heat distribution, resulting in a perfectly golden crust.
Preparation/setup
Begin by preheating the oven to 350°F. Place a baking tray on the lower rack to catch any potential overflow. In your trusty cast-iron skillet, heat the vegetable oil over medium warmth. Add the brown sugar, stirring continuously for 1 to 2 minutes until it melts and forms a caramel-like base. Remove the skillet from heat and allow this sweet mixture to cool.
As the brown sugar blend cools, prepare the apples. Peel, core, and slice both the Granny Smith and Braeburn apples into wedges about 1/2-inch thick. Toss these slices with ground cinnamon and sugar, ensuring each piece is well-coated. This blend of spices and sugar enhances the natural flavors of the apples, promising a delicious filling.
Mastering the Technique
Technique
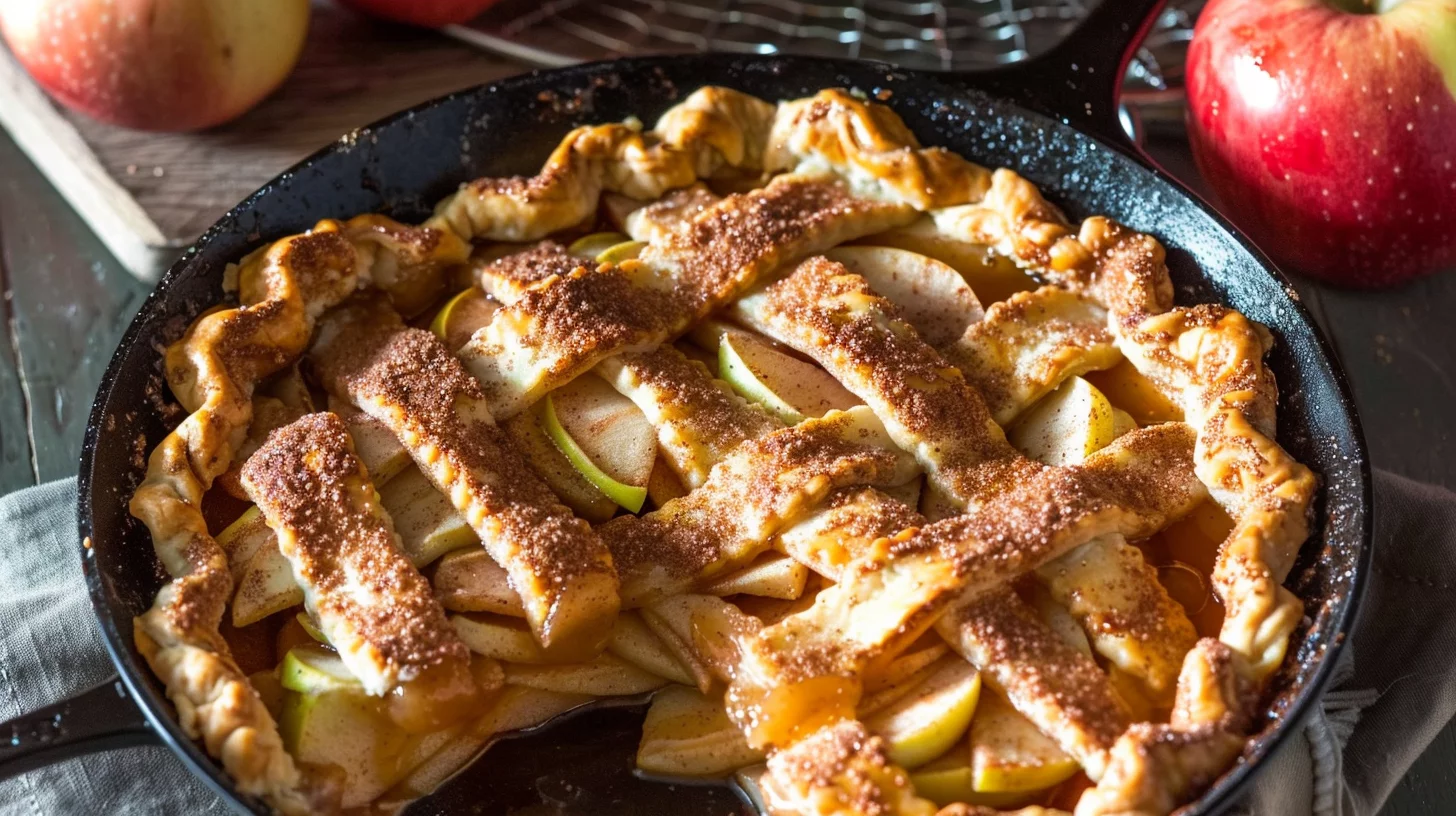
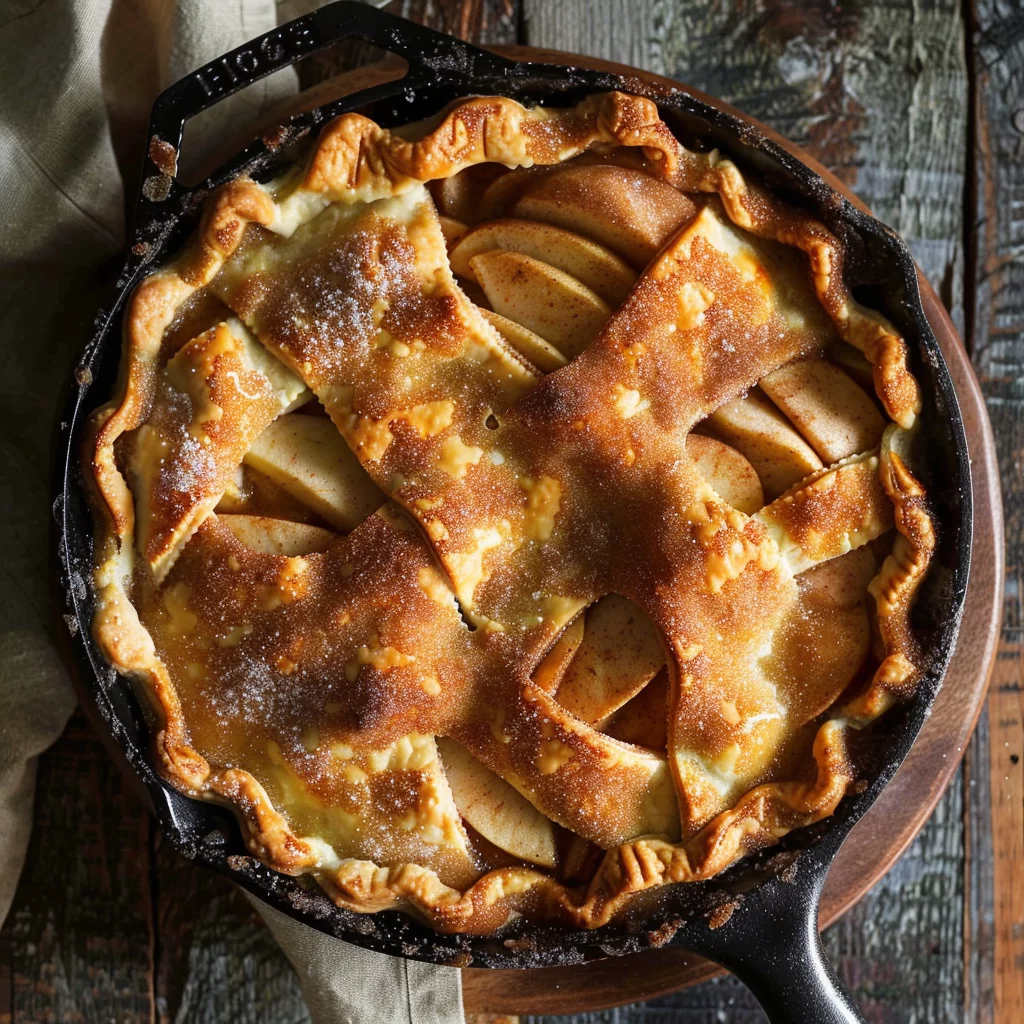
Mastering the art of a rustic skillet apple pie lies in the layering and baking process. Begin by laying one pie crust into the skillet over the cooled brown sugar mixture. This layer will absorb the caramelized sugars, adding depth to the flavors. Spread the apple mixture evenly over the crust, ensuring each bite will be packed with flavor.
Cover the apples with the second pie crust. Gently tuck the edges downwards along the sides of the skillet to seal in the filling. This step is crucial for preventing any leakage and ensuring a beautiful, rustic appearance. Beat an egg white with a splash of water until frothy, then brush this mixture over the top crust. Sprinkle with sugar to add a touch of sweetness and texture.
Rustic Skillet Apple Pie
Tips/tricks
For a golden, evenly baked crust, make 4 to 5 slits in the top to allow steam to escape. This prevents the crust from becoming soggy and helps the pie bake evenly. If you notice the crust browning too quickly, tent it with foil during the last 10 minutes of baking. This simple trick ensures your pie remains perfectly golden without over-browning.
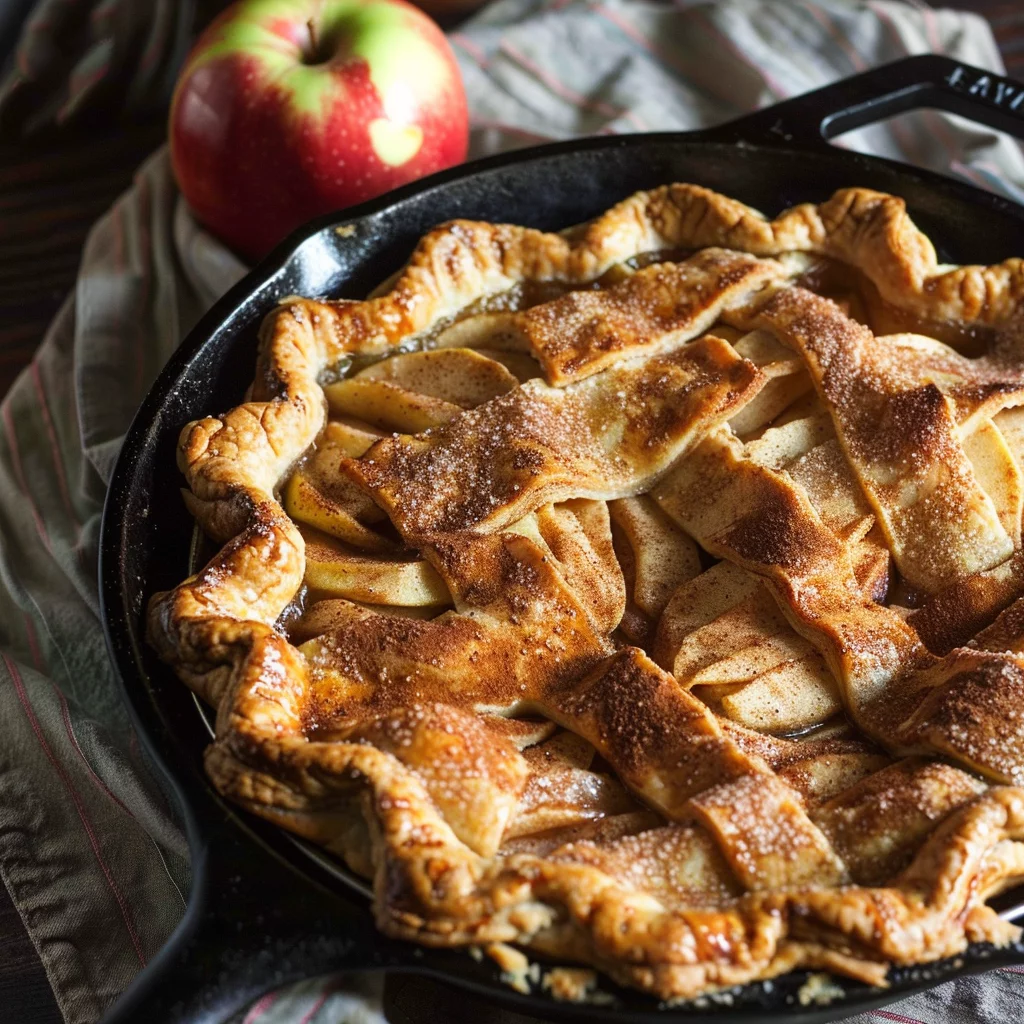
Allow the pie to cool on a wire rack for at least 30 minutes before serving. This resting period allows the filling to set, making it easier to slice and serve. For more inspiration and variations, explore our Homemade Dutch Apple Pie recipe, which offers a delightful twist on this classic dessert.
Perfecting Your Rustic Skillet Apple Pie
Perfecting results
The key to perfecting your rustic skillet apple pie lies in the balance of flavors and textures. Using a combination of apple varieties, like Granny Smith and Braeburn, ensures a harmonious blend of tartness and sweetness. Adjust the sugar content based on your preference and the natural sweetness of your apples.
For a more robust flavor, consider experimenting with different spices. A pinch of nutmeg or a dash of cardamom can elevate the flavor profile, adding warmth and complexity. However, remember that simplicity is often the best approach, allowing the natural flavors of the apples to shine.
Troubleshooting/variations
If your pie filling appears too runny, try incorporating a tablespoon of flour or cornstarch into the apple mixture before baking. This will help thicken the filling, creating a more cohesive slice. For a variation, explore our Apple Custard Impossible Pie, which offers a creamy twist on the traditional apple pie.
For those seeking a unique flavor profile, consider adding a layer of caramel sauce beneath the apple filling. This addition enhances the sweetness and introduces a delightful, gooey texture that complements the tart apples perfectly. For more creative ideas, check out Creamy Chicken Pot Pie Pasta Skillet for a savory twist on pie-inspired dishes.
Serving and Storing Your Rustic Delight
Serving/presentation
When it comes to serving your rustic skillet apple pie, presentation is key. Serve warm slices with a scoop of vanilla ice cream or a dollop of whipped cream for a classic pairing. This combination enhances the flavors, offering a delightful contrast between the warm pie and the cool, creamy toppings.
For a touch of elegance, dust the pie with powdered sugar just before serving. This simple step adds a touch of sweetness and a beautiful finish to your dessert. If you’re looking to impress guests, explore our Delicious Homemade Apple Pie recipe for additional presentation tips.
Rustic Skillet Apple Pie
Pairings/storage
Pair your rustic skillet apple pie with a hot cup of coffee or a spiced tea for a comforting treat. The warm beverage complements the pie’s flavors, making it a perfect choice for cozy gatherings or quiet evenings at home. For more pairing ideas, explore our Best Dutch Apple Pie Recipe.
To store any leftovers, cover the pie with plastic wrap or foil and refrigerate for up to three days. Reheat individual slices in the oven to maintain the crust’s crispness, or enjoy cold for a quick and satisfying snack. For more storage solutions and creative twists, check out Caramel Apple Pie Cinnamon Rolls for a delightful fusion of flavors.
Conclusion
The rustic skillet apple pie is a testament to the power of simple ingredients and traditional techniques. This recipe brings warmth and joy to any gathering, embodying the spirit of togetherness and the love of home-cooked meals. With its perfect balance of flavors and textures, this pie is more than just a dessert—it’s a cherished memory on a plate.
Embrace the art of creating this timeless classic, knowing that each slice carries with it the warmth of shared moments and the joy of culinary creativity. Whether enjoyed fresh from the oven or savored as a leftover treat, the rustic skillet apple pie remains a beloved favorite, bringing comfort and delight with every bite.
