
📑 Table of Contents ▶
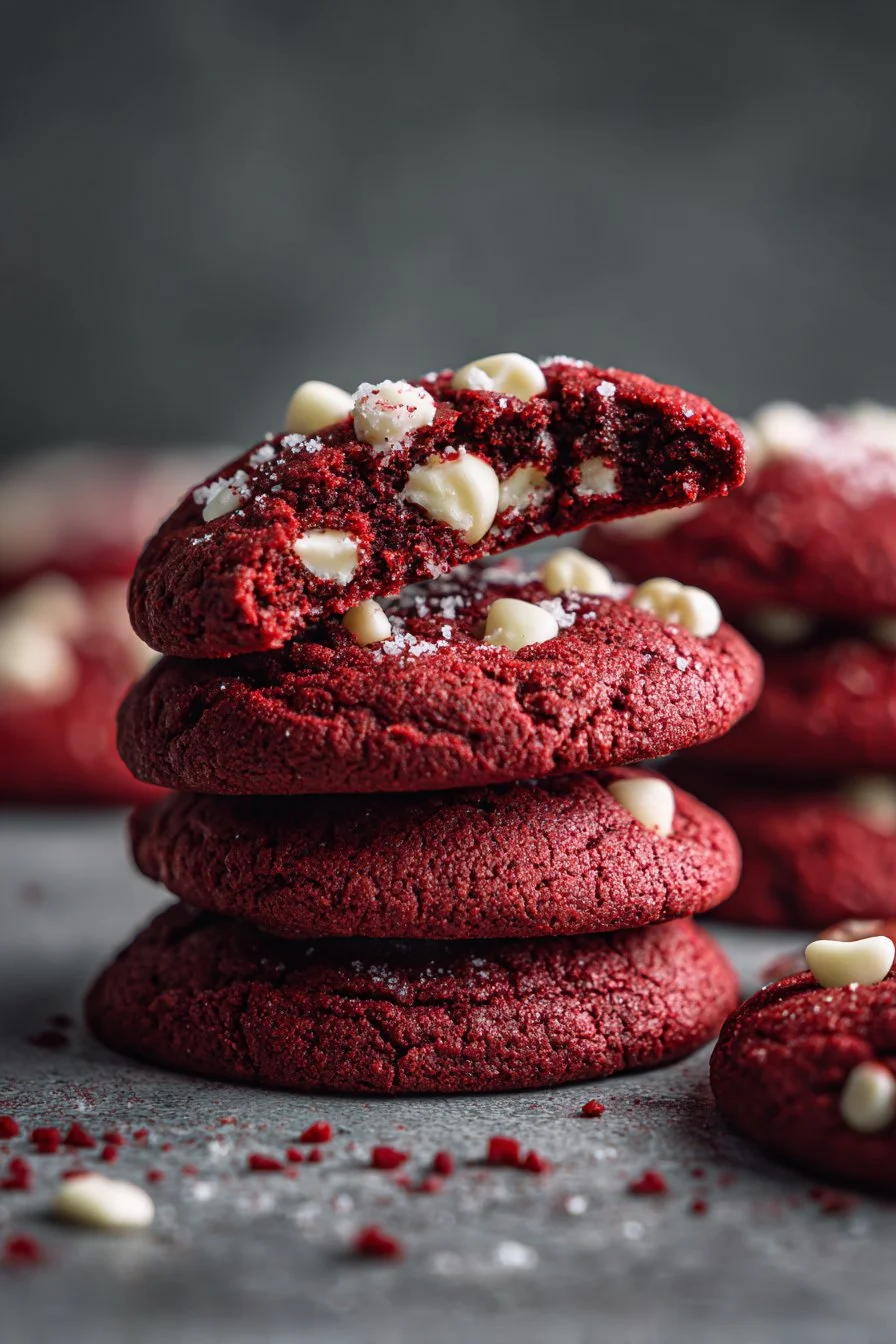
Red Velvet Cookies
A special occasion arises, and suddenly the desire for something delightful takes hold. Red velvet cookies sit at the intersection of indulgence and nostalgia, calling to mind the joy of baking and creating. Each cookie brings vibrant color and a rich flavor, making them perfect for any gathering or simply as a treat for yourself.
In the kitchen, the act of mixing, measuring, and folding feels almost meditative. There’s something magical about combining simple ingredients and transforming them into something extraordinary. The vibrant red hue plays on the senses, while the sweet aroma of cookies baking fills the air, promising delicious results.
Red velvet cookies offer a twist on the classic red velvet cake, and they fit seamlessly into holiday celebrations, birthdays, or casual get-togethers. Who can resist the combination of soft, chewy texture and the creaminess of white chocolate? Each bite not only delights the taste buds but also warms the heart, creating sweet memories to cherish.
Now, let’s make these red velvet cookies together. Start collecting your ingredients and get ready for a baking adventure that promises rich flavor and joy!
Red Velvet Cookies
Fundamentals
Every great recipe begins with understanding the essential components. For red velvet cookies, the balance of ingredients creates a delightful texture and flavor. Start with room temperature butter; this ensures the butter blends effortlessly with sugars, resulting in a light and fluffy texture.
Granulated sugar works its magic by adding sweetness, while brown sugar contributes moisture and a hint of caramel flavor. The egg adds richness, binding everything together. Vanilla extract enhances the overall flavor profile, making each bite more enjoyable.
Next, the dry ingredients play a crucial role as well. All-purpose flour provides structure, while cocoa powder imparts depth of flavor. Baking soda acts as a leavening agent, ensuring the cookies rise perfectly. Don’t forget the salt; it balances the sweetness of the sugars and enhances all the flavors present in the dough.
Preparation/setup
Preparing the kitchen sets the stage for successful cookie baking. Preheat your oven to 350°F (175°C). Gather your tools: mixing bowls, a whisk, a spatula, and a baking sheet lined with parchment paper. The parchment prevents sticking and makes cleanup effortless.
Begin by creaming together the softened unsalted butter, granulated sugar, and packed brown sugar in a large bowl. Use an electric mixer or whisk to achieve a light and fluffy mixture. This step is vital; it adds air into the dough, resulting in a more tender cookie.
Next, add in the egg and the tablespoon of vanilla extract. Beat these ingredients into the mixture until fully combined. In a separate bowl, whisk together the all-purpose flour, cocoa powder, baking soda, and salt. This ensures even distribution of the dry ingredients prior to incorporating them into the wet mixture.
Ingredients
- 1 cup unsalted butter, softened
- 1 cup granulated sugar
- 1/2 cup brown sugar, packed
- 1 large egg
- 1 tablespoon vanilla extract
- 2 cups all-purpose flour
- 1/2 cup cocoa powder
- 1 teaspoon baking soda
- 1/2 teaspoon salt
- 1 cup white chocolate chunks
- 1 tablespoon red food coloring
These key ingredients form the foundation of your red velvet cookies, ensuring they maintain the optimal balance of flavor and texture.
Directions
- Preheat your oven to 350°F (175°C).
- In a large bowl, cream together the softened butter, granulated sugar, and brown sugar until light and fluffy.
- Beat in the egg and vanilla extract until well combined.
- In another bowl, whisk together the flour, cocoa powder, baking soda, and salt.
- Gradually add the dry ingredients to the wet ingredients, mixing until just combined.
- Stir in the red food coloring and the white chocolate chunks.
- Drop rounded tablespoons of dough onto a baking sheet lined with parchment paper.
- Bake for 10-12 minutes or until the edges are set but the centers are still soft.
- Let the cookies cool on the baking sheet for a few minutes before transferring them to a wire rack to cool completely.
Perfecting the Art of Red Velvet Cookies
Baking red velvet cookies involves both technique and intuition. Understanding how to gauge doneness will ensure your cookies turn out perfectly chewy and soft. The edges should appear set while the centers might still register a slight jiggle. This softness will yield a delightful texture once cooled.
Technique
Keep a close eye on your cookies as they bake. Don’t forget the cooling time on the baking sheet; it allows them to firm up before transferring to a wire rack. If you want an extra twist, consider chilling your dough for 30 minutes before baking. This helps the flavors meld together and can enhance the texture.
Experimenting with your mixing methods can also yield delicious results. Whipping your butter and sugars longer can incorporate more air, creating lighter cookies. Alternatively, mixing only until combined leads to denser cookies.
Tips/tricks
Here are a few handy tips to get the best results from your red velvet cookies. Ensure you measure your flour correctly; too much can result in cookies that are dry and crumbly. Spoon the flour into your measuring cup before leveling it off rather than scooping directly from the bag.
If you prefer a more intense red color, feel free to add more red food coloring. Just remember, a little goes a long way, and balance is key. Lastly, if you want to incorporate some crunch, consider mixing in chopped nuts or additional chocolate chunks.
Troubleshooting Red Velvet Cookies
Even experienced bakers face challenges; the key lies in knowing how to troubleshoot. If your cookies spread too much during baking, check that your butter is not too warm and that you’re using the correct amount of flour.
Perfecting results
For perfectly uniform cookies, try using a cookie scoop to ensure each scoop of dough is the same size. This helps in achieving even baking and a polished presentation.
Assessing the texture before baking is essential; your dough should be somewhat soft and sticky but not overly wet. Don’t hesitate to adjust your flour the next time you make a batch to achieve your desired consistency.
Storage and variations
Once your cookies cool, store them in an airtight container at room temperature for up to a week. They maintain their chewy texture and delightful flavor admirably.
Consider experimenting with flavors. Add a touch of almond extract for an interesting twist, or mix in a variety of chocolate chunks. For a festive flair, top with sprinkles before baking to create a celebratory cookie perfect for any occasion.
Serving and Presenting Red Velvet Cookies
The presentation of your red velvet cookies plays a significant role in their appeal. Arrange them on a decorative platter, or stack them creatively for an eye-catching display during gatherings. Pair them with a glass of milk or a cup of coffee for a delightful treat.
Pairings/storage
While pairing with a beverage or dessert is entirely subjective, consider offering an array of options, such as coffee, tea, or a refreshing glass of lemonade. These cookies maintain freshness when stored correctly. Keep them sealed in an airtight container, and if desired, freeze unbaked dough to bake fresh cookies anytime.
Each component of the cookie, from the vibrant hue to the comforting flavor, will impress your guests. Let your creativity shine through in how you serve and share these delectable red velvet cookies.
