📑 Table of Contents ▶
- How To Make Mozzarella Cheese Skulls
- How To Make Mozzarella Cheese Skulls
- Fundamentals
- Preparation/setup
- Making Mozzarella Skull Variations
- Technique
- Tips/tricks
- Perfecting Mozzarella Cheese Skull Salad
- Perfecting results
- Troubleshooting/variations
- Serving and Storing Mozzarella Cheese Skull Salad
- Serving/presentation
- Pairings/storage
- Conclusion
- FAQs – How To Make Mozzarella Cheese Skulls
I believe that cooking is a journey, one that takes us through a myriad of flavors and experiences. My love for the kitchen bloomed from watching my grandmother create magic with simple ingredients. Her meals were always a celebration, a testament to the power of food to bring people together. This philosophy is at the heart of Yumoti, where every recipe is crafted to inspire and delight.
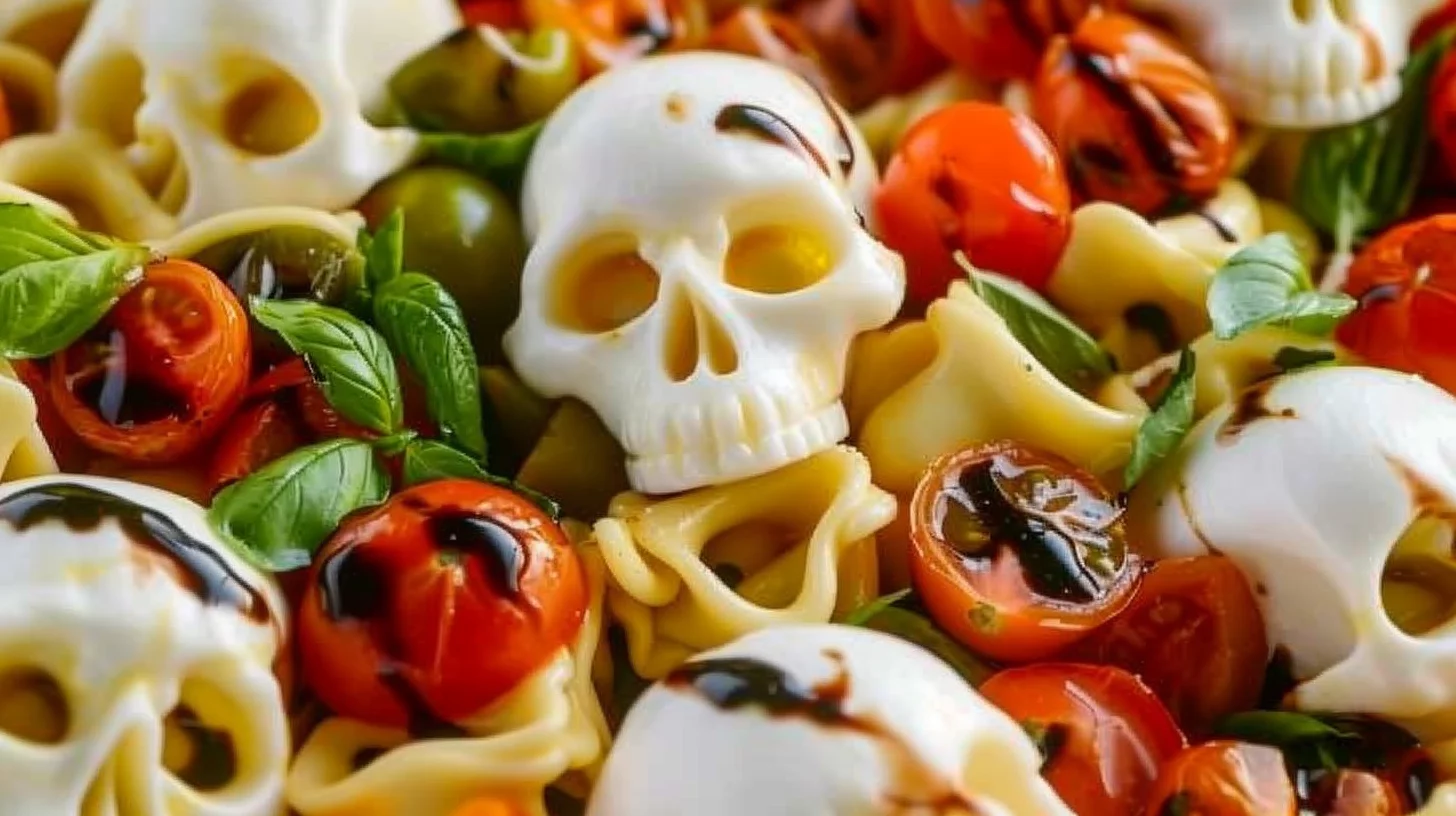
When I think about transforming simple ingredients into something extraordinary, the concept of how to make mozzarella cheese skulls comes to mind. This recipe is not just about the final dish; it’s about the joy of creation and the anticipation of sharing it with others. Mozzarella cheese skulls add a whimsical touch to any meal, turning an ordinary pasta salad into a festive feast.
The process of making mozzarella cheese skulls is straightforward, yet it offers a playful twist that is sure to captivate both young and old. With just a few ingredients, you can craft a dish that not only tastes delicious but also sparks conversation and joy around the table. Discovering how to make mozzarella cheese skulls is like unlocking a new level of culinary creativity.
How To Make Mozzarella Cheese Skulls
Print
How To Make Mozzarella Cheese Skulls
- Prep Time: 10 minutes
- Cook Time: 30 minutes
- Total Time: 1 hour 10 minutes
- Yield: 4 servings
- Category: Appetizer
- Method: Baking
- Cuisine: Italian
Description
Learn how to create spooky and delicious Mozzarella Cheese Skulls with this step-by-step recipe. Perfect for Halloween parties and themed events!
Ingredients
- 8 oz (226 g) fresh mozzarella pearls
- 4 tbsp (60 ml) olive oil
- 4 tbsp (60 ml) balsamic vinegar
- 2 tbsp (30 ml) chopped fresh basil
- 8 oz (226 g) cherry tomatoes, halved
- 9 oz (255 g) refrigerated vegetable tortellini*
- Salt & Pepper
Instructions
- Place 3-4 fresh mozzarella pearls into each compartment of a silicone skull mold, adjusting based on the mold’s size.
- Set your oven to 200°F to preheat.
- Position the silicone skull mold on a baking sheet and transfer it to the warmed oven; bake for 20 minutes. Avoid overbaking to prevent the mozzarella from drying out, which could create holes in the skulls.
- After 20 minutes, take the mold out of the oven and gently press the mozzarella deeper into the mold using the back of a spoon.
- Refrigerate the mold for 30 minutes to allow it to cool and solidify.
- Bring a pot of salted water to a rolling boil.
- In a large mixing bowl, combine olive oil and balsamic vinegar with a whisk.
- Stir in the chopped fresh basil.
- Cut the cherry tomatoes in half and incorporate them into the bowl, keeping some whole if preferred.
- When the water is boiling, add the refrigerated tortellini and cook following the package instructions, typically 5-7 to 10 minutes.
- Once the tortellini is cooked, drain it in a colander and rinse with cold water to cool.
- After cooling, mix the tortellini into the bowl with the other ingredients.
- Add salt and pepper to taste.
- Taste the mixture and adjust seasonings as needed.
- Cover the bowl and refrigerate for a minimum of 4 hours.
- Before serving, give the pasta salad a good toss.
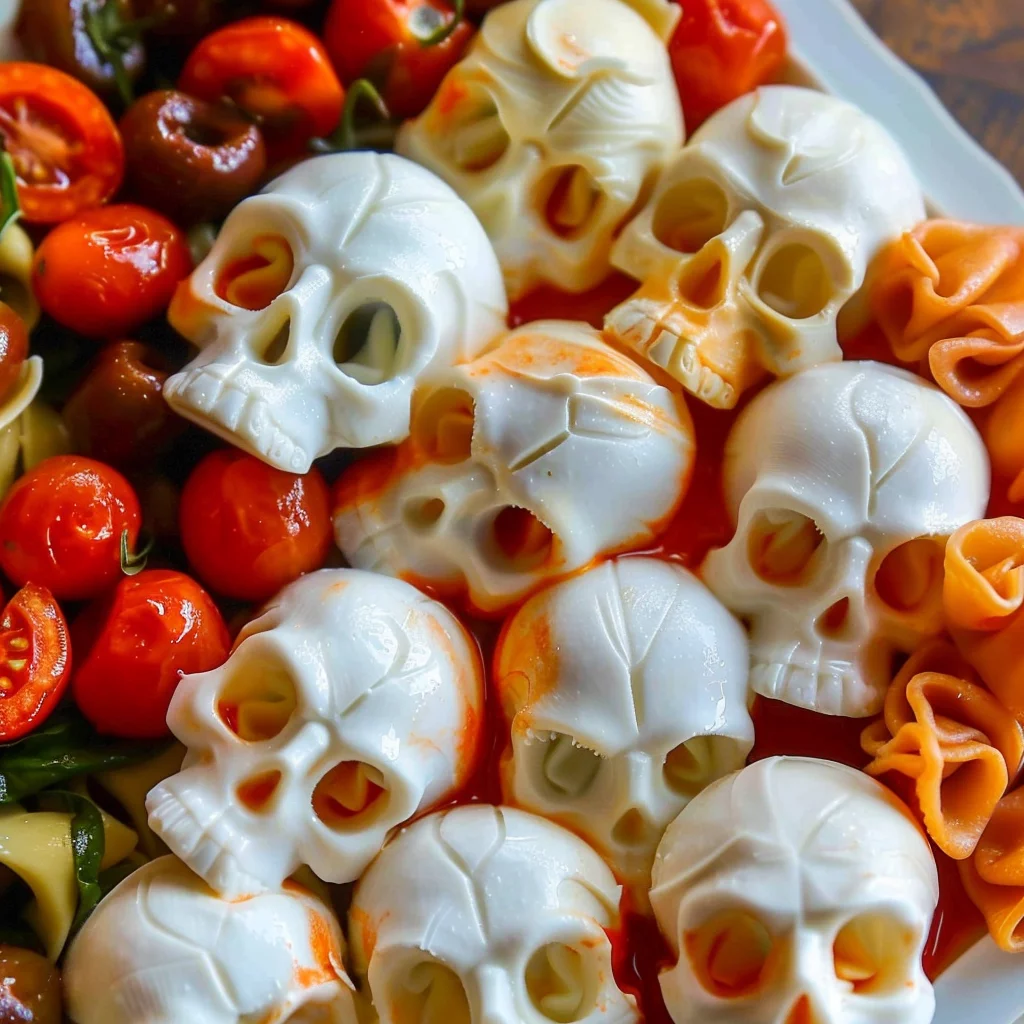
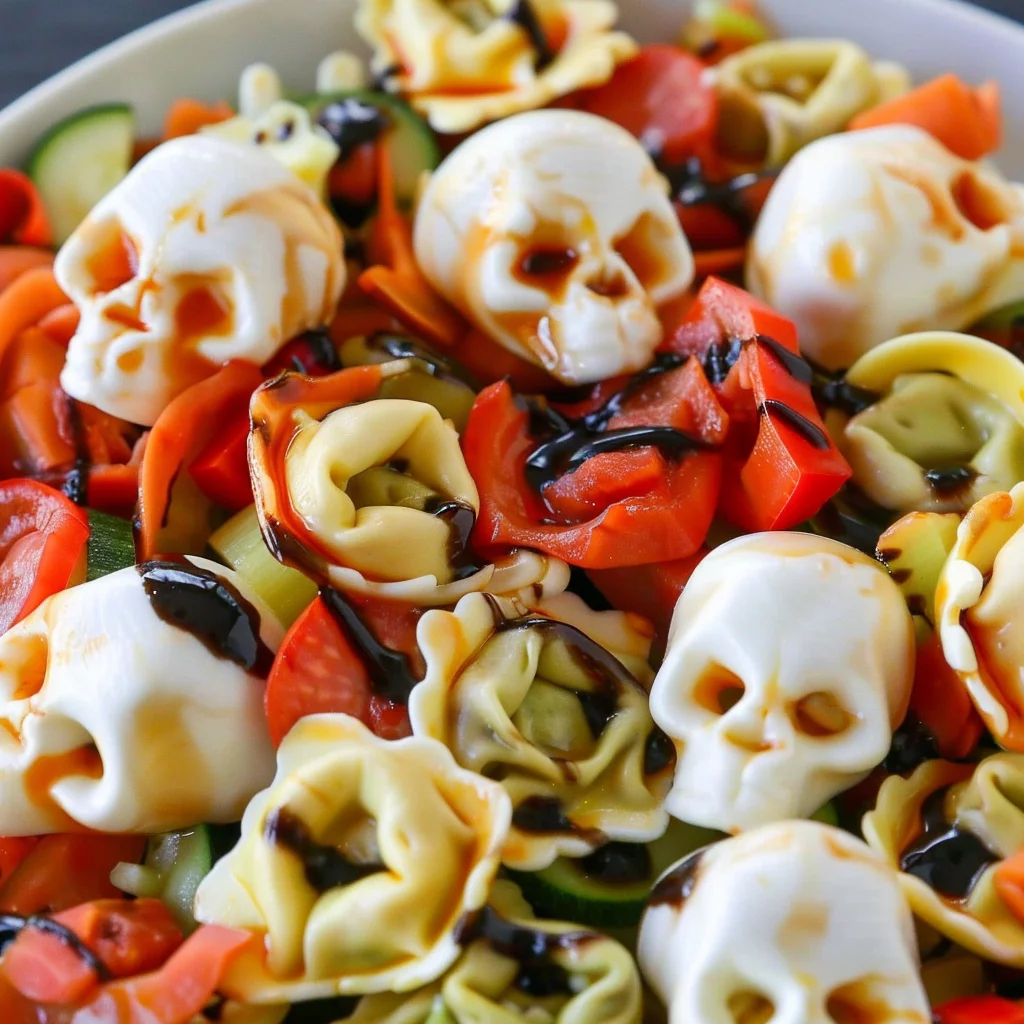
- Take the chilled mozzarella skulls out of the fridge and remove them from the mold.
- Arrange the mozzarella skulls atop the pasta salad.
- Consider adding more olive oil and balsamic vinegar, as the pasta may have absorbed some of the liquid while chilling.
- For a finishing touch, drizzle with balsamic glaze before serving.
Notes
- Marinate cherry tomatoes in olive oil and balsamic vinegar for added flavor before mixing into the tortellini salad.
- Chiffonade fresh basil leaves to enhance the basil flavor in the salad.
- Adjust seasoning of the chilled tortellini salad as flavors may have mellowed, garnish with fresh basil leaves for a visually appealing presentation.
Fundamentals
Mastering how to make mozzarella cheese skulls begins with understanding the basics of this playful recipe. Fresh mozzarella pearls serve as the foundation, offering a creamy texture that pairs perfectly with other vibrant ingredients. The key is to use high-quality mozzarella, ensuring that the skulls not only look impressive but also melt in your mouth.
Olive oil and balsamic vinegar provide a flavorful backdrop, enhancing the natural taste of the mozzarella and complementing the fresh basil. These ingredients create a harmonious blend that elevates the dish’s overall profile. The addition of cherry tomatoes introduces a burst of color and freshness, making this recipe visually appealing and delicious.
Preparation/setup
Begin by preparing your silicone skull mold, which will shape the mozzarella into delightful forms. Place 3-4 mozzarella pearls into each compartment, adjusting based on the mold’s size. Preheat your oven to 200°F, ensuring that the cheese melts gently without drying out. Position the mold on a baking sheet and bake for 20 minutes.
Once baked, press the mozzarella deeper into the mold using the back of a spoon. Refrigerate the mold for 30 minutes, allowing the cheese to solidify into perfect skull shapes. While the mozzarella chills, prepare the tortellini by boiling them according to the package instructions. This step ensures that your pasta is ready to be combined with the flavorful dressing.
Making Mozzarella Skull Variations
Technique
The art of how to make mozzarella cheese skulls lies in the technique, particularly when it comes to baking the mozzarella. Maintaining a low oven temperature is crucial to prevent the cheese from drying out and creating holes in the skulls. This gentle heat allows the mozzarella to melt just enough to take the shape of the mold while retaining its moisture.
After baking, the refrigeration step is essential for achieving firm, well-defined skulls. This process not only solidifies the cheese but also makes it easier to handle when unmolding. The result is a set of mozzarella skulls that hold their shape beautifully, ready to crown your pasta salad masterpiece.
How To Make Mozzarella Cheese Skulls
Tips/tricks
To enhance the flavor of your mozzarella cheese skulls, consider infusing the olive oil with garlic or herbs before mixing it into the salad. This simple trick adds depth to the dish, accentuating the fresh basil and tomatoes. Additionally, when preparing the tortellini, rinse them with cold water after cooking to prevent them from sticking together and to cool them down quickly.
If you’re looking for more creative culinary ideas, you might enjoy exploring how to create your own freezer smoothie packs, a convenient way to enjoy fresh flavors any time. Alternatively, if you’re interested in hearty meals, you can learn how to finish a sous vide brisket in the oven, perfect for a comforting gathering.
Perfecting Mozzarella Cheese Skull Salad
Perfecting results
Achieving perfection in how to make mozzarella cheese skulls requires attention to detail. Ensuring that each ingredient is fresh and of high quality is paramount to the dish’s success. The mozzarella should be creamy, the basil fragrant, and the tomatoes ripe. These elements come together to create a pasta salad that is as delightful to eat as it is to behold.
Incorporating variations can also enhance the dish. You might try using different types of tortellini, such as spinach or cheese-filled, to add another layer of flavor. This flexibility allows you to tailor the recipe to suit your preferences or dietary needs, ensuring that everyone at the table can enjoy this unique creation.
Troubleshooting/variations
If your mozzarella skulls don’t hold their shape, consider adjusting the baking time or the amount of mozzarella in each mold. Ensuring that the cheese is evenly distributed can help achieve consistent results. For those seeking additional inspiration, explore these delightful zucchini and potatoes with mozzarella cheese, a comforting side dish that pairs beautifully with any meal.
For those with a penchant for soups, Yumoti offers a variety of recipes to explore. Consider trying our roasted vegetable soup for a nourishing option or the instant pot potato soup for a quick and hearty meal. These recipes provide a comforting complement to your mozzarella cheese skull salad.
Serving and Storing Mozzarella Cheese Skull Salad
Serving/presentation
When it comes to serving your mozzarella cheese skull salad, presentation is key. Arrange the chilled mozzarella skulls atop the pasta salad for an eye-catching display. Consider drizzling the dish with balsamic glaze just before serving, adding a touch of sweetness and shine that enhances the visual appeal.
This dish is perfect for gatherings, offering a creative and delicious centerpiece that guests will adore. The combination of creamy mozzarella, tangy balsamic, and fresh tomatoes creates a balanced flavor profile that satisfies the palate. Serve it alongside other homemade delights, such as our apple pie dip with cinnamon tortilla chips, for a memorable culinary experience.
How To Make Mozzarella Cheese Skulls
Pairings/storage
While enjoying your mozzarella cheese skull salad, consider pairing it with refreshing beverages like iced tea or lemonade, which complement the dish’s flavors beautifully. If you have leftovers, store them in an airtight container in the refrigerator for up to two days, ensuring that the salad remains fresh and flavorful.
For additional meal ideas, explore our collection of nourishing soups. The chicken detox soup is perfect for a light and rejuvenating meal, while the anti-inflammatory turmeric chicken soup offers a flavorful health boost. These recipes provide versatile options to suit any occasion.
Conclusion
Mastering how to make mozzarella cheese skulls opens up a world of culinary creativity. This playful recipe combines simplicity with flair, resulting in a dish that delights both the eyes and the palate. By focusing on high-quality ingredients and technique, you can create a memorable dining experience that brings joy to the table.
The versatility of this recipe allows for endless variations, making it adaptable to any occasion or preference. Whether you’re hosting a festive gathering or simply enjoying a meal with loved ones, mozzarella cheese skulls add a touch of whimsy and sophistication to your menu. Explore the delightful possibilities and savor the moments shared over a delicious meal.
