📑 Table of Contents ▶
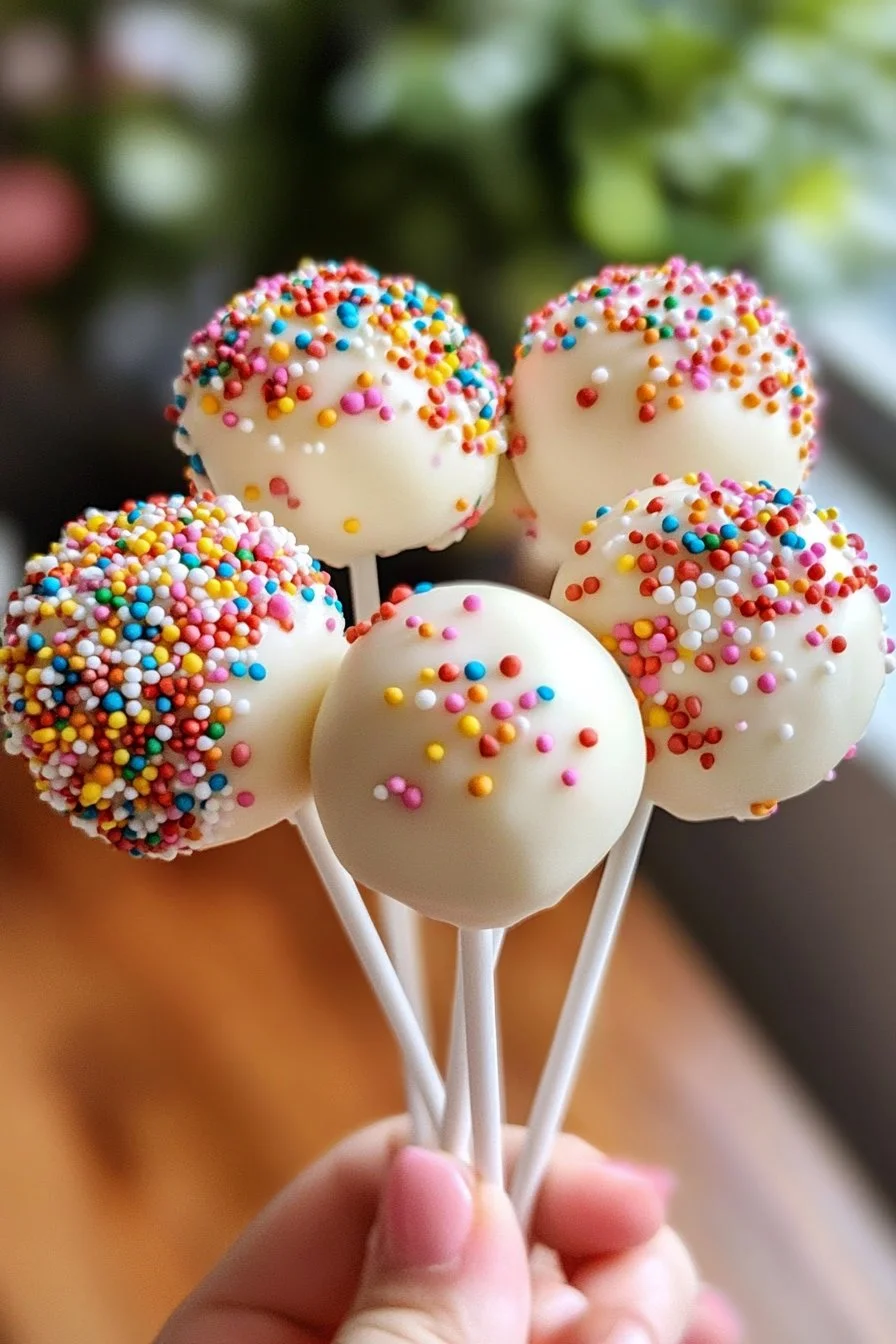
Fairy Bread-Inspired Cake Pops
Food creates vivid memories. As a child, I often played with friends after school, and our impromptu snack breaks spark joy even now. The highlight was always fairy bread—just white bread with butter and rainbow sprinkles. It brought color to our afternoons, turning ordinary moments into sweet celebrations. I recall giggling while making the rainbow sprinkle bread, a ritual that seemed like magic.
After some time, the idea of fairy bread transformed. Instead of bread, imagining those vibrant flavors in cake form took over. Thus, fairy bread-inspired cake pops came into being! These delightful bites combine the fun of cake and sprinkles, perfect for any gathering. Simple yet playful, they beckon both kids and adults alike to savor every moment.
Making these cake pops from a single cake mix and some frosting guarantees satisfaction without stress. The joy of creation can rekindle fond memories while crafting something beautiful. Let’s explore how to turn this fairy tale into a delicious reality, ensuring fun pops of flavor and color become a centerpiece for any celebration.
The Joy of Fairy Bread-Inspired Cake Pops
Fundamentals
Crafting fairy bread-inspired cake pops embraces creativity and nostalgia, mingling delightful flavors with a dash of whimsy. Create a treat that stands out at parties, desserts, or family gatherings using a few simple ingredients. You’ll only need one cake mix of your choice, a cup of frosting, candy melts, and plenty of rainbow sprinkles.
From the baking phase to the joyful finishing touches, each step invites you to unleash your inner baker. These cake pops extend beyond mere snacks; they transform parties into celebrations and ordinary days into something special.
Preparation/setup
Before diving into cake pop fun, gather your ingredients. You’ll want to prepare a clean space, ensuring every tool and ingredient is at your fingertips. An essential step in preparation involves reading the cake mix package instructions. This guidance leads the way to a perfectly baked cake, setting a productive tone.
The mixing bowl comes next. Use a large bowl for crumbling cooled cake, as it helps you combine evenly with the frosting later. Knowing how to create a balanced mixture makes a notable difference, ensuring pops hold their shape beautifully.
Ingredients
- 1 cake mix (any flavor)
- 1 cup frosting (any flavor)
- Rainbow sprinkles
- Candy melts or chocolate for coating
Directions
- Bake the cake mix according to package instructions and let it cool.
- Crumble the cooled cake into a large bowl and mix in the frosting until fully combined.
- Form the mixture into small balls and place them on a baking sheet.
- Insert a stick into each ball and freeze for about 30 minutes.
- Melt the candy melts or chocolate according to package instructions.
- Dip each cake pop into the melted chocolate and then roll in rainbow sprinkles.
- Allow the pops to set before serving.
Fun with Cake Pops
Technique
Mastering the technique behind cake pops involves understanding mixture consistency and freezing time. Combining crumbled cake with frosting may seem simple but creates a texture vital for a successful pop. Properly shaping them before freezing prepares them for the sugary coating, ensuring they hold their delightful form when dipped in melted chocolate.
When melting your candy melts or chocolate, carefully monitor the temperature. Too high could ruin the chocolate, while too low can affect the dipping process. Aim for a smooth, pouring-like texture that clings gently to the cake pops.
Tips/tricks
For optimal results, consider adding a splash of flavor to your frosting. Extracts like vanilla or almond can take your cake pops to new heights, enhancing their overall taste profile.
Keep an eye on the consistency of the melted candy; if it becomes too thick, feel free to add a small dollop of shortening or vegetable oil to help thin it down. This helps ensure a flawless coating around your cake pops. Additionally, let your cake pops chill in the refrigerator for a few minutes after coating. This will help set the chocolate while making them easier to handle.
Perfecting the Cake Pops
Perfecting results
Getting the perfect cake pop texture depends heavily on the cooling and freezing steps. Cooling the baked cake is essential to prevent the frosting from melting, as a warm mixture leads to sticky results.
Freezing them for 30 minutes creates sturdiness, allowing them to hold together when dipped. Plan this step wisely, making time to let them set without rushing.
Troubleshooting/variations
If your cake pops melt in the melting process, check your coating temperature. High heat can lead to problems while dipping, affecting how the chocolate adheres. You might also experience crumbling on the edges if the cake pops aren’t firm enough. Should this happen, popping them back into the freezer for a few moments often resolves the issue.
Consider experimenting with different cake and frosting flavors. Chocolate cake combined with vanilla frosting offers rich contrast, while a lemon cake with raspberry frosting brings refreshing brightness. Each combination delivers unique results and experiences.
Presenting Cake Pops
Serving/presentation
Make your fairy bread-inspired cake pops shine by presenting them on a festive cake stand or a whimsical display board. Consider a fun arrangement filled with colorful paper or party-themed decorations.
If serving at a special event, coordinate the sprinkles and cake mix flavor with your theme. Bright rainbow sprinkles match festive occasions, while elegant sprinkles can complement more refined gatherings.
Pairings/storage
These delightful treats pair wonderfully with simple beverages like milk, fruit juices, or even ice cream for dessert. The versatility means they can fit into various settings, adding a sweet touch at kids’ birthday parties or elegant gatherings alike.
When it comes to storage, place unused cake pops in a sealed container or a zip-lock bag, keeping them fresh for up to a week. Their generous flavor and fun presentation make them ideal for snacking or sharing with family and friends longer.
Creating fairy bread-inspired cake pops serves joy, creativity, and whimsy in every flavorful bite. The memories made along the way turn simple ingredients into delightful treats that spark happiness wherever they go.
Print
Fairy Bread-Inspired Cake Pops
- Prep Time: 15 minutes
- Cook Time: 30 minutes
- Total Time: 45 minutes
- Yield: 24 servings
- Category: Dessert
- Method: Freezing
- Cuisine: American
- Diet: Vegetarian
Description
Delightful cake pops inspired by the childhood favorite fairy bread, combining cake, frosting, and rainbow sprinkles for a fun treat.
Ingredients
- 1 cake mix (any flavor)
- 1 cup frosting (any flavor)
- Rainbow sprinkles
- Candy melts or chocolate for coating
Instructions
- Bake the cake mix according to package instructions and let it cool.
- Crumble the cooled cake into a large bowl and mix in the frosting until fully combined.
- Form the mixture into small balls and place them on a baking sheet.
- Insert a stick into each ball and freeze for about 30 minutes.
- Melt the candy melts or chocolate according to package instructions.
- Dip each cake pop into the melted chocolate and then roll in rainbow sprinkles.
- Allow the pops to set before serving.
Notes
For added flavor, consider mixing vanilla or almond extract into the frosting. Ensure proper cooling and freezing times for best results.
