📑 Table of Contents ▶
- Making Crispy Dill Chicken Sandwiches
- Fundamentals
- Preparation/Setup
- Directions
- Perfecting the Crispy Dill Chicken Experience
- Technique
- Tips/Tricks
- Troubleshooting and Variations
- Perfecting Results
- Troubleshooting/Variations
- Serving and Presentation
- Serving/Presentation
- Pairings/Storage
- Crispy Dill Chicken Sandwich
Crispy Dill Chicken Sandwich Recipe
Personal memories often revolve around food, and my favorite moments often include crispy dill chicken sandwiches. The crackling sound of each bite brings me back to family gatherings, where the aroma of chicken frying filled the air. Everyone eagerly awaited their turn to build the perfect sandwich: crunchy fried chicken, crispy dill pickles, and refreshing lettuce nestled between soft brioche buns. These sandwiches brought smiles and laughter, turning simple meals into cherished celebrations.
The beauty of a crispy dill chicken sandwich lies not just in its texture but in the vibrant flavors that come together. Each bite offers the delightful blend of savory and tangy, a perfect contrast that keeps you reaching for more. The combination of spices, herbs, and creamy aioli enhances the experience to make it unforgettable.
Crafting these sandwiches might seem ambitious, but the process is simple, and the rewards are bountiful. Once you master the art of frying chicken to golden perfection, you’ll want to share it with friends and family. Let’s dive in and explore how to create your own crispy dill chicken sandwiches that will leave everyone craving seconds.
Making Crispy Dill Chicken Sandwiches
Fundamentals
Crispy dill chicken sandwiches start with quality ingredients. The star of the show is, of course, the chicken. Choose large boneless, skinless chicken breasts for optimal cooking. These pieces absorb the marinade beautifully, allowing their flavors to develop during the chilling process.
Next comes the buttermilk. It tenderizes the chicken while infusing it with moisture and flavor. Dill pickle juice lends an extra zesty element, ensuring the chicken has a unique taste profile. Don’t skip out on the seasoning in both the marinade and the dredging flour; they elevate the entire sandwich.
Preparation/Setup
Before diving into the cooking process, prepare a workspace. Gather all your ingredients and utensils, ensuring everything is within reach. Start by marinating the chicken. In a medium bowl, mix buttermilk, dill pickle juice, egg, salt, black pepper, garlic powder, and paprika until well-combined. Submerge the chicken breasts in the marinade, cover, and refrigerate for at least two hours, or overnight for more flavor impact.
Next, create the dredging mix. In a large, shallow dish, combine all-purpose flour, cornstarch, dried dill weed, baking powder, salt, and black pepper. Whisk thoroughly to ensure even seasoning throughout.
Ingredients
- 2 large boneless, skinless chicken breasts (about 6-8 ounces each)
- 1 cup buttermilk
- 2 tablespoons dill pickle juice
- 1 large egg
- 1 teaspoon salt
- 1/2 teaspoon black pepper
- 1/2 teaspoon garlic powder
- 1/4 teaspoon paprika
- 2 cups all-purpose flour
- 1/2 cup cornstarch
- 1 tablespoon dried dill weed
- 1 teaspoon baking powder
- 1 teaspoon salt
- 1/2 teaspoon black pepper
- 1 cup mayonnaise
- 2 tablespoons finely chopped fresh dill
- 1 tablespoon lemon juice
- 1 clove garlic, minced
- 1 teaspoon Dijon mustard
- Salt and pepper to taste
- 4 brioche buns, split
- 4 slices cheddar cheese (or your favorite cheese)
- 1 cup shredded lettuce
- 1/2 cup dill pickle chips
- 2 tablespoons butter, melted (for toasting buns)
- Vegetable oil, for frying (about 4-6 cups)
Directions
- Begin by whisking together the buttermilk, dill pickle juice, egg, salt, black pepper, garlic powder, and paprika in a medium bowl.
- Submerge the chicken breasts in the buttermilk mixture, cover, and refrigerate for at least two hours or overnight.
- In a separate large, shallow dish, combine flour, cornstarch, dill weed, baking powder, salt, and black pepper.
- Remove a chicken breast from the marinade, allowing excess to drip off, then coat both sides in the flour mixture.
- Shake off the excess flour. Repeat with the remaining chicken breasts. For extra crispiness, consider double dredging by returning the coated chicken to the buttermilk before re-coating in flour.
- Pour vegetable oil into a large pot or Dutch oven, heating it over medium-high until it reaches 350°F (175°C).
- Carefully place one or two chicken breasts into the hot oil, ensuring not to overcrowd. Fry each side for approximately 6-8 minutes or until the chicken reaches an internal temperature of 165°F (74°C).
- Remove the chicken with a slotted spoon and transfer to a wire rack lined with paper towels to drain.
- For the dill aioli, mix mayonnaise, fresh dill, lemon juice, minced garlic, and Dijon mustard in a small bowl. Season with salt and pepper to taste, and chill for at least 30 minutes to meld flavors.
- Brush melted butter on the split sides of the brioche buns and toast them in a skillet over medium heat until golden and crispy.
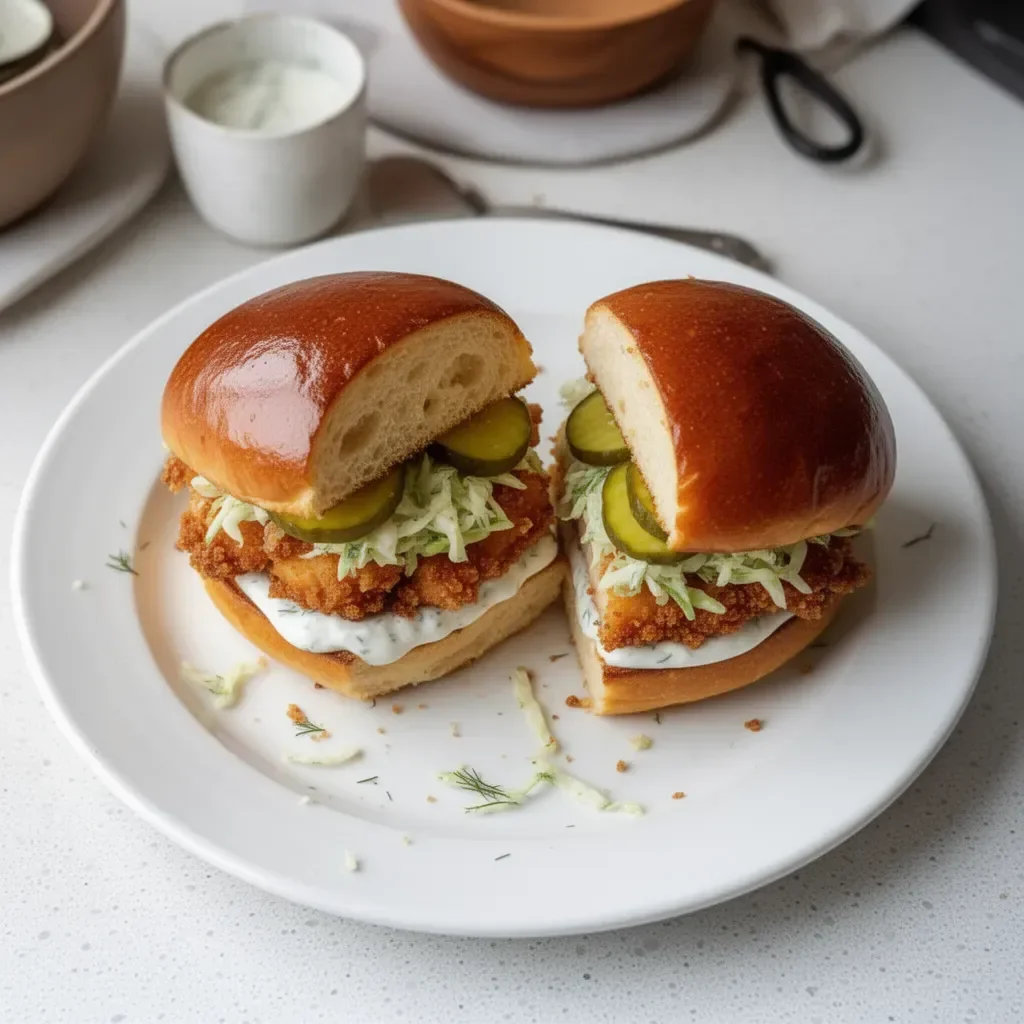
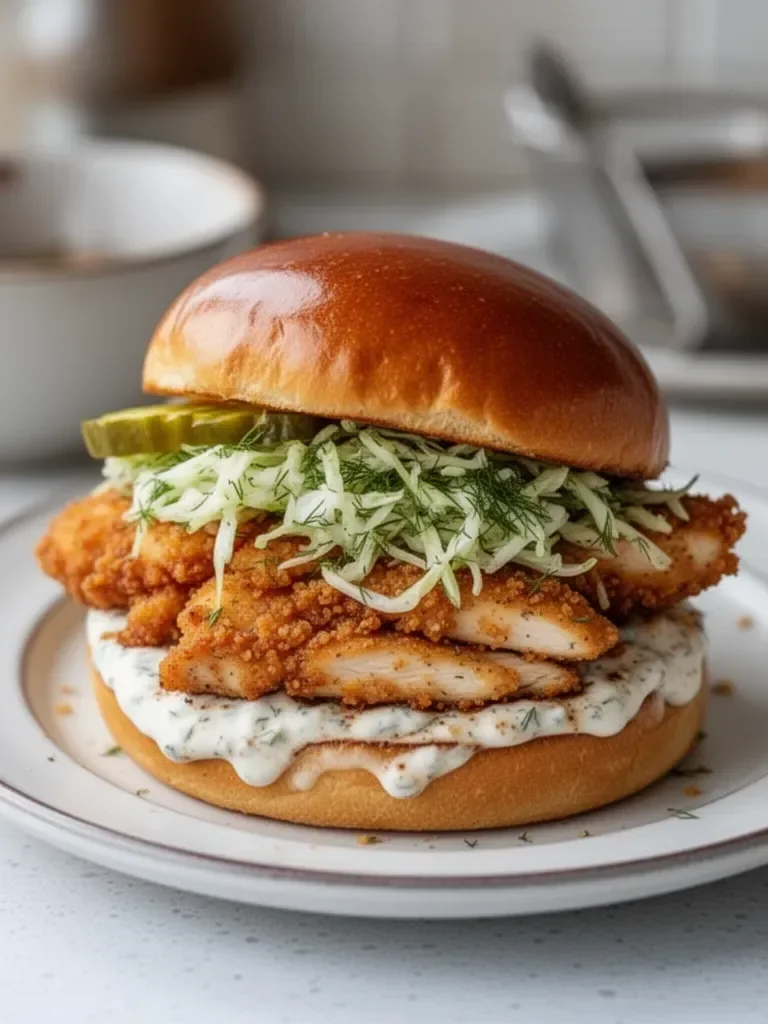
- Assemble the sandwiches by spreading dill aioli on both the top and bottom buns. Layer shredded lettuce on the bottom, then place the crispy chicken breast, cheddar cheese, and dill pickle chips before closing with the top bun.
Perfecting the Crispy Dill Chicken Experience
Technique
Achieving the ideal crispy texture requires some key techniques. The dredging process is crucial for creating that golden crust. Make sure to coat the chicken thoroughly in the flour mixture, ensuring it adheres properly. This layer protects the chicken during frying, allowing steam to escape and keeping the meat succulent.
The temperature of the oil is vital. Use a deep-fry thermometer to maintain the oil’s temperature, preventing it from dropping when adding the chicken. This ensures a crispy exterior while cooking the chicken evenly inside.
Tips/Tricks
For even better results, consider double dredging the chicken. After the initial coating, dip the chicken back into the buttermilk, and then coat it in the flour mixture again. This technique results in an even thicker, crunchier crust.
If you’re frying multiple batches, monitor the oil temperature closely, adding more oil if necessary to keep the chicken submerged. Allow the oil to return to the appropriate temperature before adding new pieces to maintain that crispiness.
Troubleshooting and Variations
Perfecting Results
If your chicken isn’t crispy, it might be due to excess moisture. Ensure the chicken is well-coated and allow excess marinade to drip off. Additionally, check the oil temperature; it should stay consistent while frying.
To keep the chicken juicy, avoid overcooking. Monitor the internal temperature closely, removing it from the oil as soon as it reaches 165°F (74°C). Proper draining on a wire rack also helps maintain that delightful crunch.
Troubleshooting/Variations
You can easily adapt this crispy dill chicken sandwich recipe for a spicy twist. Add cayenne pepper to the dredging mix for an extra kick or serve with spicy aioli using sriracha or hot sauce.
For those wanting a healthier option, try baking the breaded chicken in the oven. Preheat the oven to 425°F (220°C) and place the breaded chicken on a baking sheet lined with parchment paper. Spray lightly with cooking oil and bake, flipping halfway, until golden brown and cooked through.
Serving and Presentation
Serving/Presentation
Presentation elevates your crispy dill chicken sandwiches. Serve each sandwich on a rustic wooden board or in a chic basket lined with parchment paper. Add a few extra dill pickle chips or a sprinkle of fresh dill on top for an inviting touch.
Pair the sandwiches with a side of crispy fries or a refreshing coleslaw. The contrasting textures and flavors enhance the dish’s overall experience, appealing to both the eyes and taste buds.
Pairings/Storage
Crispy dill chicken sandwiches shine alongside crunchy potato chips, fresh fruit salad, or even a zesty pasta salad. They make for an excellent meal any time of day.
For leftovers, store the chicken separately in an airtight container to retain its crispness. Reheat in the oven at 375°F (190°C) for a few minutes until warmed through while maintaining their delightful crunch.
Crispy dill chicken sandwiches embody comfort and flavor in every bite. The process may require a bit of time, but the result pays off with tender, juicy chicken, crispy toppings, and a creamy aioli that ties it all together. Serve these delectable creations at your next gathering, and watch as they disappear, leaving smiles all around.
Print
Crispy Dill Chicken Sandwich
- Prep Time: 120 minutes
- Cook Time: 20 minutes
- Total Time: 140 minutes
- Yield: 4 servings
- Category: Main Course
- Method: Frying
- Cuisine: American
- Diet: None
Description
Delight in the crispy textures and vibrant flavors of these dill chicken sandwiches, perfect for family gatherings or a satisfying meal.
Ingredients
- 2 large boneless, skinless chicken breasts (about 6-8 ounces each)
- 1 cup buttermilk
- 2 tablespoons dill pickle juice
- 1 large egg
- 1 teaspoon salt
- 1/2 teaspoon black pepper
- 1/2 teaspoon garlic powder
- 1/4 teaspoon paprika
- 2 cups all-purpose flour
- 1/2 cup cornstarch
- 1 tablespoon dried dill weed
- 1 teaspoon baking powder
- 1 teaspoon salt
- 1/2 teaspoon black pepper
- 1 cup mayonnaise
- 2 tablespoons finely chopped fresh dill
- 1 tablespoon lemon juice
- 1 clove garlic, minced
- 1 teaspoon Dijon mustard
- Salt and pepper to taste
- 4 brioche buns, split
- 4 slices cheddar cheese (or your favorite cheese)
- 1 cup shredded lettuce
- 1/2 cup dill pickle chips
- 2 tablespoons butter, melted (for toasting buns)
- Vegetable oil, for frying (about 4-6 cups)
Instructions
- Begin by whisking together the buttermilk, dill pickle juice, egg, salt, black pepper, garlic powder, and paprika in a medium bowl.
- Submerge the chicken breasts in the buttermilk mixture, cover, and refrigerate for at least two hours or overnight.
- In a separate large, shallow dish, combine flour, cornstarch, dill weed, baking powder, salt, and black pepper.
- Remove a chicken breast from the marinade, allowing excess to drip off, then coat both sides in the flour mixture.
- Shake off the excess flour. Repeat with the remaining chicken breasts.
- Pour vegetable oil into a large pot or Dutch oven, heating it over medium-high until it reaches 350°F (175°C).
- Carefully place one or two chicken breasts into the hot oil, ensuring not to overcrowd. Fry each side for approximately 6-8 minutes or until the chicken reaches an internal temperature of 165°F (74°C).
- Remove the chicken with a slotted spoon and transfer to a wire rack lined with paper towels to drain.
- For the dill aioli, mix mayonnaise, fresh dill, lemon juice, minced garlic, and Dijon mustard in a small bowl. Season with salt and pepper to taste, and chill for at least 30 minutes to meld flavors.
- Brush melted butter on the split sides of the brioche buns and toast them in a skillet over medium heat until golden and crispy.
- Assemble the sandwiches by spreading dill aioli on both the top and bottom buns. Layer shredded lettuce on the bottom, then place the crispy chicken breast, cheddar cheese, and dill pickle chips before closing with the top bun.
Notes
For extra crispiness, consider double dredging the chicken by returning it to the buttermilk before re-coating in flour.
