📑 Table of Contents ▶
- Christmas Tree Charcuterie Board Essentials
- Fundamentals
- Preparation/Setup
- Directions
- Enhancing Your Charcuterie Experience
- Technique
- Tips/Tricks
- Perfecting Your Charcuterie Board Results
- Perfecting Results
- Troubleshooting/Variations
- Serving and Storing Your Charcuterie Board
- Serving/Presentation
- Pairings/Storage
Christmas Tree Shaped Charcuterie Board
Creating a Christmas Tree Shaped Charcuterie Board feels like a delightful holiday tradition waiting to happen. The first time I tried this, laughter filled the room as friends gathered around, admiring the centerpiece of our festive feast. This themed charcuterie board brings a whimsical touch to holiday gatherings, turning simple ingredients into a stunning visual display.
The combination of vibrant colors and different textures makes this dish inviting and impressive, even to those who may not be skilled in the kitchen. It’s not just about the flavors but also about creating an experience that everyone can share. Each ingredient tells a story, much like our friendships and family ties. With a bit of creativity, the Christmas Tree Shaped Charcuterie Board becomes a symbol of togetherness.
This board isn’t just for Christmas. It makes a festive decoration for any holiday gathering or family get-together. As you prepare this edible masterpiece, you’ll find joy in every step. Let’s dive into the fundamentals of designing this charming charcuterie board!
Christmas Tree Charcuterie Board Essentials
Fundamentals
The Christmas Tree Shaped Charcuterie Board embodies simplicity and creativity. Choosing the right ingredients sets the foundation for your design. Fresh rosemary sprigs form the outline of your tree, while an array of cheeses, fruits, and nuts fills in the details.
These components cater to various tastes while providing beautiful contrasts. The texture of cheeses against the crunch of nuts and the juiciness of the grapes brings an exciting dimension. This diverse selection ensures that there is something for everyone to enjoy. The vibrant hues of the ingredients further enhance the visual appeal, making the board not just delicious but also eye-catching.
Taking the time to think about the presentation impacts the overall experience. Consider the natural shape of the foods as you arrange them. Each element plays a part in creating a tree-like structure that will have your guests enchanted.
Preparation/Setup
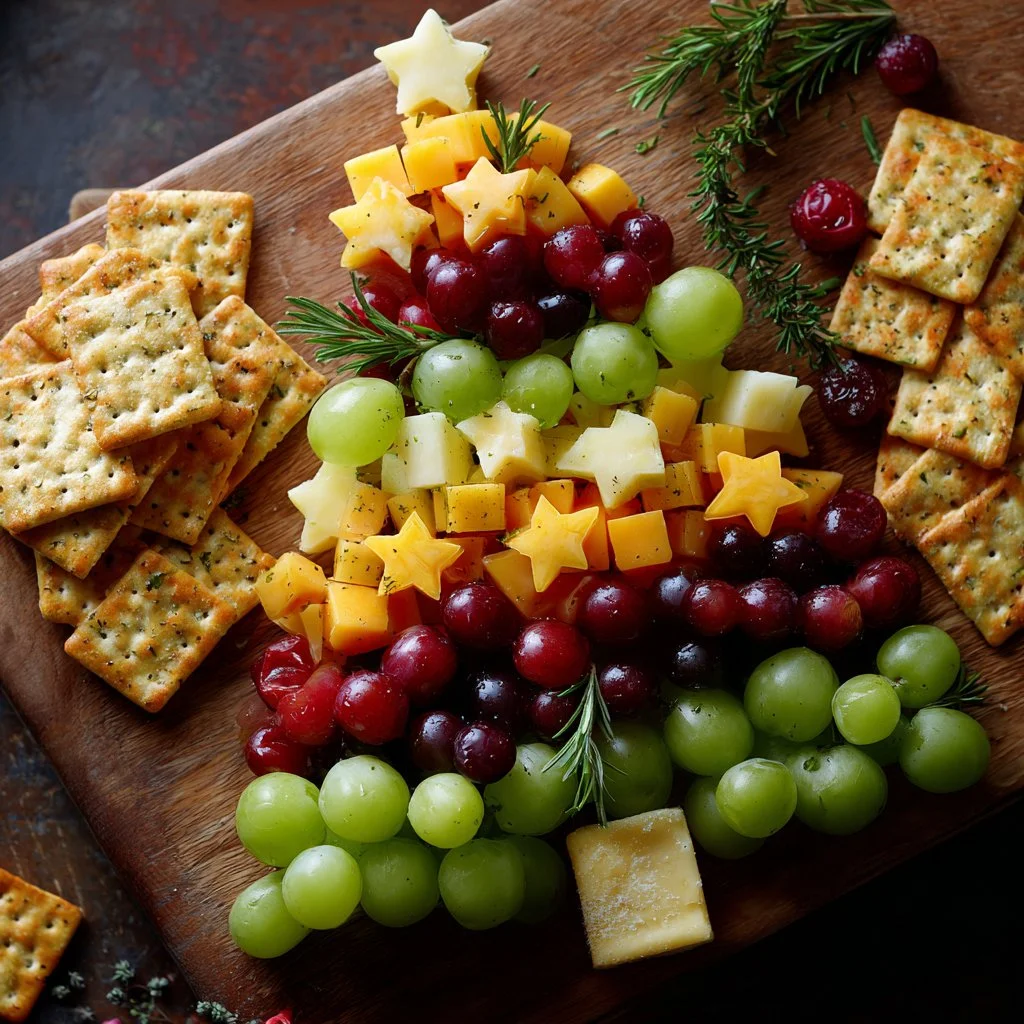
Start the charcuterie board by gathering your ingredients. Ensure you have 10 fresh rosemary sprigs, one celery stalk, an assortment of seedless grapes, and three types of cheese: sharp cheddar, Monterey Jack, and mild cheddar. Don’t forget about the cranberries, star fruit, assorted nuts, and kiwi for finishing touches.
Begin by laying out the rosemary sprigs on a cutting board or platter. This creates a tree shape that needs adjusting; just listen to your artistic instincts! Place the celery stalk at the bottom to act as the trunk. Once the outline is set, it’s time to arrange the other ingredients.
Begin filling in the rows from the bottom up, narrowing each subsequent layer. Start with a row of cheese, followed by clusters of red grapes and continuing with another layer of cheese. Alternate between the different grape colors until you reach the top. Use kiwi slices to form the tree’s crown and finish with a piece of star fruit perched on top.
Ingredients
Gather the following ingredients and prepare them for assembly:
- 10 fresh rosemary sprigs
- 1 celery stalk (trunk)
- Red, green, and black seedless grapes (clipped into small clusters or removed from stems)
- 4 ounces sharp cheddar cheese (cut into ¾-inch squares)
- 4 ounces Monterey Jack cheese (cut to the same size as other cheeses)
- 4 ounces mild cheddar cheese (cut to the same size as other cheeses)
- ½ cup fresh cranberries
- 1-2 star fruits (sliced)
- 1 cup assorted nuts
- 1 green kiwi fruit (sliced)
Directions
- Begin by outlining your tree with the rosemary sprigs starting at the top and spreading outward.
- Adjust the sprigs to create a full and balanced shape.
- Place the celery stalk at the bottom for the trunk, selecting a length that looks appealing.
- Assemble each row from the bottom up, ensuring the design remains well-balanced and visually pleasing.
- Start with a row of sharp cheddar, followed by clusters of red grapes.
- Add another layer of Monterey Jack, then fill with green grapes.
- Continue layering with mild cheddar and finish with black grapes.
- Place kiwi slices toward the top for a creative peak to your tree.
- Top it all off with a slice of star fruit to crown your creation.
- Sprinkle cranberries and assorted nuts around the tree, using almonds to create a pot at the base of the celery stalk if desired.
Your Christmas Tree Shaped Charcuterie Board is now complete! You can assemble this beautiful dish up to four hours before serving and store it covered in plastic wrap in the refrigerator.
Enhancing Your Charcuterie Experience
Technique
Creating a charming Christmas Tree Shaped Charcuterie Board requires technique and a bit of flair. Begin with the rosemary foundation, ensuring each sprig is firmly anchored. When placing fruits and cheeses, try to intersperse colors and textures to maintain visual interest.
Do not hesitate to layer ingredients creatively. Instead of only linear rows, consider forming a staggered arrangement for added dynamism. This enhances the festive feel while optimizing flavor experiences as guests mix and match.
Tips/Tricks
- Use fresh ingredients whenever possible for the best flavor.
- Arrange the nuts neatly at the base or alongside the tree for a finished look.
- Place extra star fruit slices around the board as decorative accents.
- Experiment with varying shapes for cheeses for a unique presentation.
- Encourage guests to take from different sections, keeping the display looking fresh throughout the gathering.
Maintaining balance in the layout not only pleases the eye but also keeps the flavor profiles enjoyable as guests taste their way through the board.
Perfecting Your Charcuterie Board Results
Perfecting Results
To ensure your Christmas Tree Shaped Charcuterie Board stands out, focus on texture, flavor balance, and aesthetics. Use different cheeses to provide varied tastes, while the grapes and cranberries add juicy bursts. The assortment of nuts adds a crunchy element that contrasts beautifully with the softer ingredients.
Adjust the number of each item based on your guest count. This way, everyone gets to experience the delightful combinations without overwhelming the layout. Ideally, the board should highlight the season’s colors, making it a true showstopper for holiday gatherings.
Troubleshooting/Variations
When designing the board, you may find that some elements don’t fit as expected. Don’t worry! Be flexible and rearrange until the design pleases you. If star fruit isn’t available, substitute with another fruit that offers a similar shape, such as a thinly sliced apple or a few berries arranged in an interesting way.
Feel free to switch up the types or amounts of nuts or cheeses used based on your guests’ preferences. The goal is to create a board that everyone can appreciate while showcasing your creativity.
Serving and Storing Your Charcuterie Board
Serving/Presentation
Presenting your Christmas Tree Shaped Charcuterie Board is as critical as preparing it. Use a large wooden board or festive platter that complements the holiday spirit. The vibrant colors of the ingredients will brighten any table.
Position the board centrally, encouraging guests to gather around and explore the layers. Providing small plates or napkins nearby allows your guests to create their own festive plates easily. This engagement adds a personal touch to the experience.
Pairings/Storage
This charcuterie board pairs well with various fruit juices, flavored sparkling waters, or non-alcoholic punches, enhancing its festive spirit. Store any leftovers in an airtight container in the refrigerator for up to two days. For long-lasting freshness, keep the nuts separate to maintain their crunch.
Use the opportunity to share your creations with others in your community or at family gatherings, allowing this beautiful Christmas Tree Shaped Charcuterie Board to take center stage at every occasion. Assemble it again for New Year celebrations or birthday parties to encourage connection over good food and joy!
Embrace the delightful art of creating a Christmas Tree Shaped Charcuterie Board—because food truly brings us together during the most wonderful time of the year!
Print
Christmas Tree Shaped Charcuterie Board
- Prep Time: 15 minutes
- Cook Time: 0 minutes
- Total Time: 15 minutes
- Yield: 8 servings
- Category: Appetizer
- Method: Assembly
- Cuisine: American
- Diet: Vegetarian
Description
A festive and visually appealing charcuterie board shaped like a Christmas tree, perfect for holiday gatherings.
Ingredients
- 10 fresh rosemary sprigs
- 1 celery stalk (trunk)
- Red, green, and black seedless grapes (clipped into small clusters or removed from stems)
- 4 ounces sharp cheddar cheese (cut into ¾-inch squares)
- 4 ounces Monterey Jack cheese (cut to the same size as other cheeses)
- 4 ounces mild cheddar cheese (cut to the same size as other cheeses)
- ½ cup fresh cranberries
- 1-2 star fruits (sliced)
- 1 cup assorted nuts
- 1 green kiwi fruit (sliced)
Instructions
- Outline your tree with the rosemary sprigs starting at the top and spreading outward.
- Adjust the sprigs to create a full and balanced shape.
- Place the celery stalk at the bottom for the trunk, selecting a length that looks appealing.
- Assemble each row from the bottom up, ensuring the design remains well-balanced and visually pleasing.
- Start with a row of sharp cheddar, followed by clusters of red grapes.
- Add another layer of Monterey Jack, then fill with green grapes.
- Continue layering with mild cheddar and finish with black grapes.
- Place kiwi slices toward the top for a creative peak to your tree.
- Top it off with a slice of star fruit to crown your creation.
- Sprinkle cranberries and assorted nuts around the tree, using almonds to create a pot at the base of the celery stalk if desired.
Notes
Feel free to switch up the types or amounts of nuts or cheeses based on your guests’ preferences. Use fresh ingredients for the best flavor.
