📑 Table of Contents ▶
- Black Widow Chocolate Bark
- Creating Black Widow Chocolate Bark
- Fundamentals
- Preparation/setup
- Crafting the Perfect Black Widow Treat
- Technique
- Tips/tricks
- Mastering Your Black Widow Chocolate Bark
- Perfecting results
- Troubleshooting/variations
- Serving and Storing Your Spooky Creation
- Serving/presentation
- Pairings/storage
- Conclusion
- FAQs – Black Widow Chocolate Bark
I believe that a good recipe has the power to bring people together, spark joy, and turn ordinary moments into cherished memories. In my childhood home, the kitchen was the heart of our universe. The clatter of pots, the smell of herbs simmering, and the warmth of shared meals are some of my earliest and fondest memories.
Growing up, my grandmother was my culinary muse. She taught me that magic can happen in the kitchen without fancy ingredients or complicated techniques. Her meals were a reflection of care, patience, and creativity. Watching her cook taught me that food is more than sustenance—it’s a language of love.
Those moments planted the seed that would eventually grow into Yumoti. My website is a place where food lovers can find recipes that are simple, soulful, and always full of flavor. Today, we’re diving into a spooky yet delightful treat—the Black Widow Chocolate Bark. This recipe is perfect for Halloween and a fun way to create sweet memories in the kitchen.
Black Widow Chocolate Bark
- Prep Time: 5 minutes
- Cook Time: 2 minutes
- Total Time: 7 minutes
- Yield: 6 servings
- Category: Dessert
- Method: Baking
- Cuisine: American
Description
Indulge in the decadent delight of Black Widow Chocolate Bark! Learn how to create this irresistible sweet treat that’s perfect for any occasion.
Ingredients
- 1 bag Green Candy Melts (12 oz / 340g)
- 1/2 cup White Candy Melts (4 oz / 120g)
- 1–2 tablespoons Red Candy Melts (0.5–1 oz / 15-30g)
- Toothpicks
- Gummy Spiders
- Halloween Sprinkles
Instructions
- Place a sheet of wax paper on a baking tray.
- Empty the whole package of green candy melts into a microwave-safe bowl.
- Warm the green candy melts in the microwave in 30-second intervals.
- IMPORTANT: Stir the candy melts thoroughly after every 30 seconds to prevent them from seizing up and becoming unusable.
- You will likely need to repeat the heating process four to five times until the candy melts are completely smooth and fluid.
- If the texture is still uneven, consider using Wilton’s EZ Thins to achieve a smooth, pourable consistency.
- Evenly spread the melted candy over the wax paper on the baking tray.
- Quickly place the gummy spiders on top, ensuring they are spaced out to allow for easy breaking into individual pieces.
- For a single batch, use six spiders to create six individual pieces of bark. Double the amount for a larger batch.
- In a separate microwave-safe bowl, melt a small amount of red candy melts in the same manner as the green, taking 30-45 seconds.
- Mix the red candy melts until they are smooth and fluid. Use EZ Melts if needed for a smoother texture.
- Dip a toothpick about 1/2 inch into the red candy melts and gently touch it to the lower part of each spider to mimic a black widow’s marking.
- Place 1/2 cup of white candy melts into a small microwave-safe bowl and heat them in 30-second intervals, stirring after each heating.
- Since this amount is smaller, it should only take 2 to 3 intervals to achieve a smooth, fluid consistency.
- Once smooth, use the back of a spoon to drizzle the white candy melts over the green bark and spiders, creating a web-like effect.
- Sprinkle the Halloween-themed decorations over the surface while the candy is still soft and sticky.
- Let the candy set at room temperature for a few hours, or chill it in the fridge or freezer for 10-15 minutes until firm.
- Once hardened, cut the bark into pieces using a knife.
Notes
- Stir the green candy melts thoroughly after each 30-second interval in the microwave to prevent seizing.
- Use Wilton’s EZ Thins if the melted candy texture is clumpy for a smoother consistency.
- Drizzle white candy melts over the bark using the back of a spoon for a controlled, web-like effect.
Creating Black Widow Chocolate Bark
Fundamentals
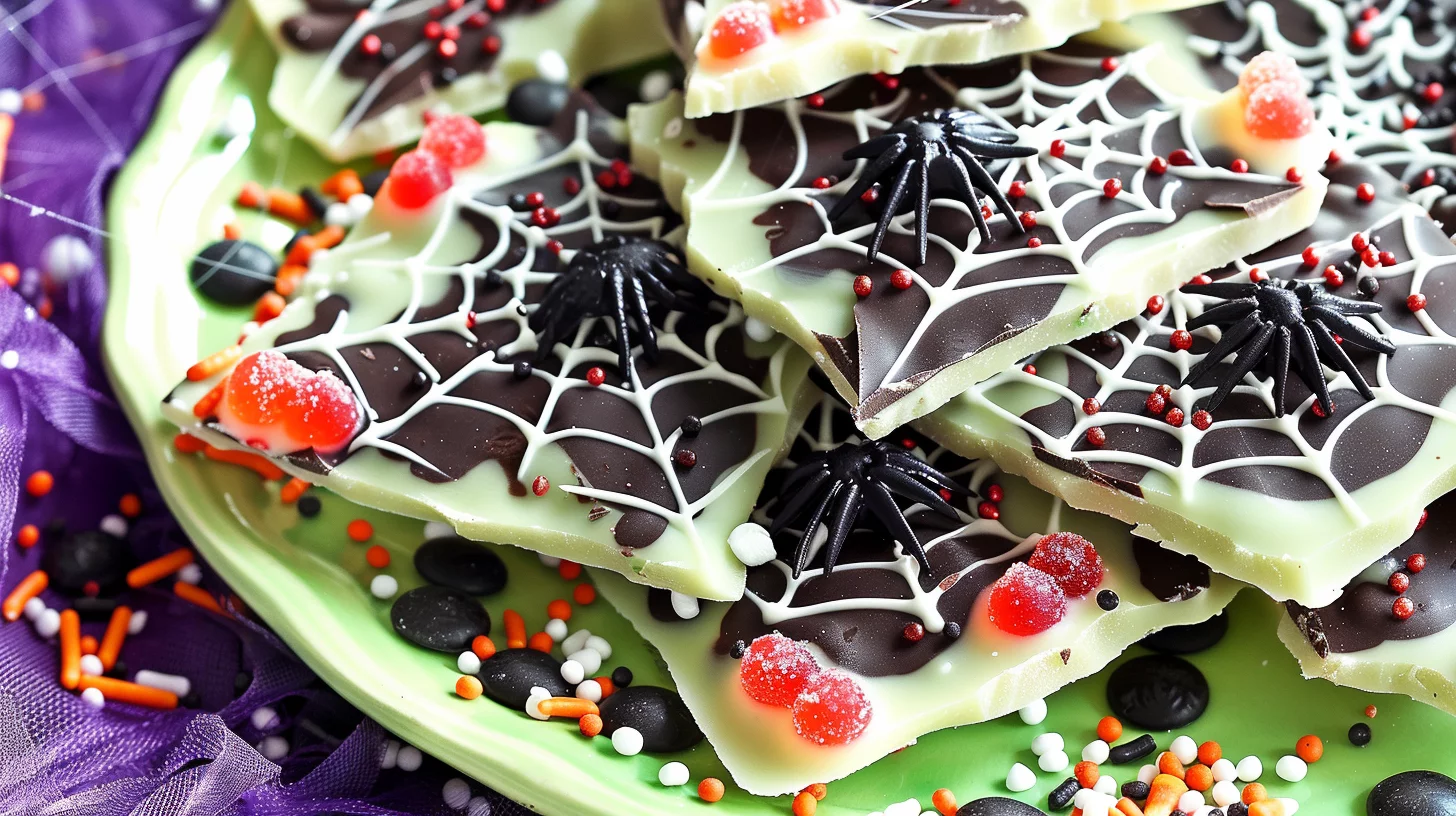
Transforming simple ingredients into a festive Halloween treat is an art. The Black Widow Chocolate Bark combines the eeriness of gummy spiders with the vibrant colors of candy melts. This concoction is as fun to make as it is to eat. The key ingredients include green, white, and red candy melts, along with gummy spiders and Halloween sprinkles. Each component plays a crucial role in creating the visual and taste appeal of this spooky snack.
The green candy melts form the base of our bark, offering a ghoulish backdrop for the gummy spiders. We then enhance the spooky theme by adding red candy melts to mimic the iconic markings of a black widow spider. Finally, a drizzle of white candy melts creates a web-like effect, adding an extra layer of Halloween magic.
Preparation/setup
Begin by preparing your workspace. Place a sheet of wax paper on a baking tray to ensure easy removal of the bark once it sets. Next, empty the entire package of green candy melts into a microwave-safe bowl. This will be the base color of your bark, setting the stage for a truly eerie treat.
Warm the green candy melts in the microwave using 30-second intervals. It’s crucial to stir thoroughly after each interval to prevent the candy from seizing up. This step is fundamental to achieving a smooth, pourable consistency. If you find the texture uneven, consider using Wilton’s EZ Thins to refine the mixture.
Crafting the Perfect Black Widow Treat
Technique
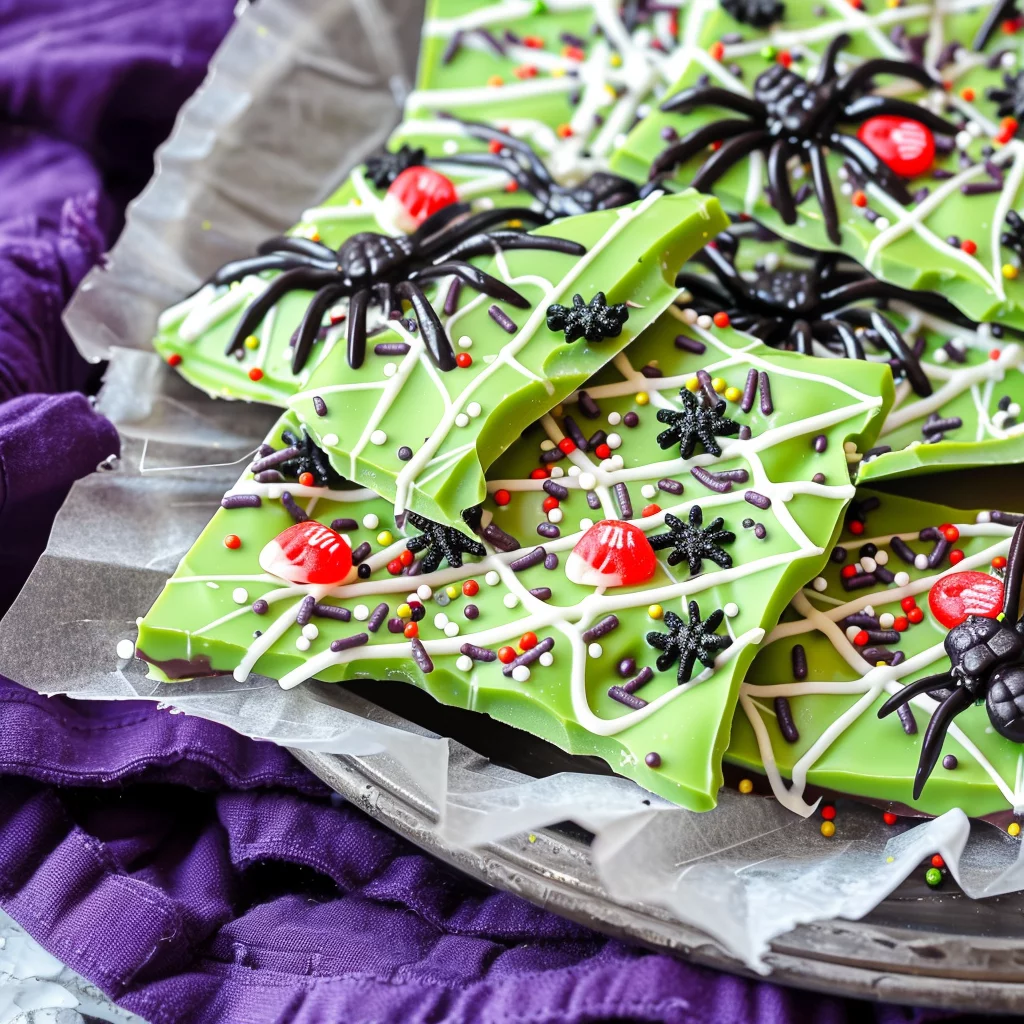
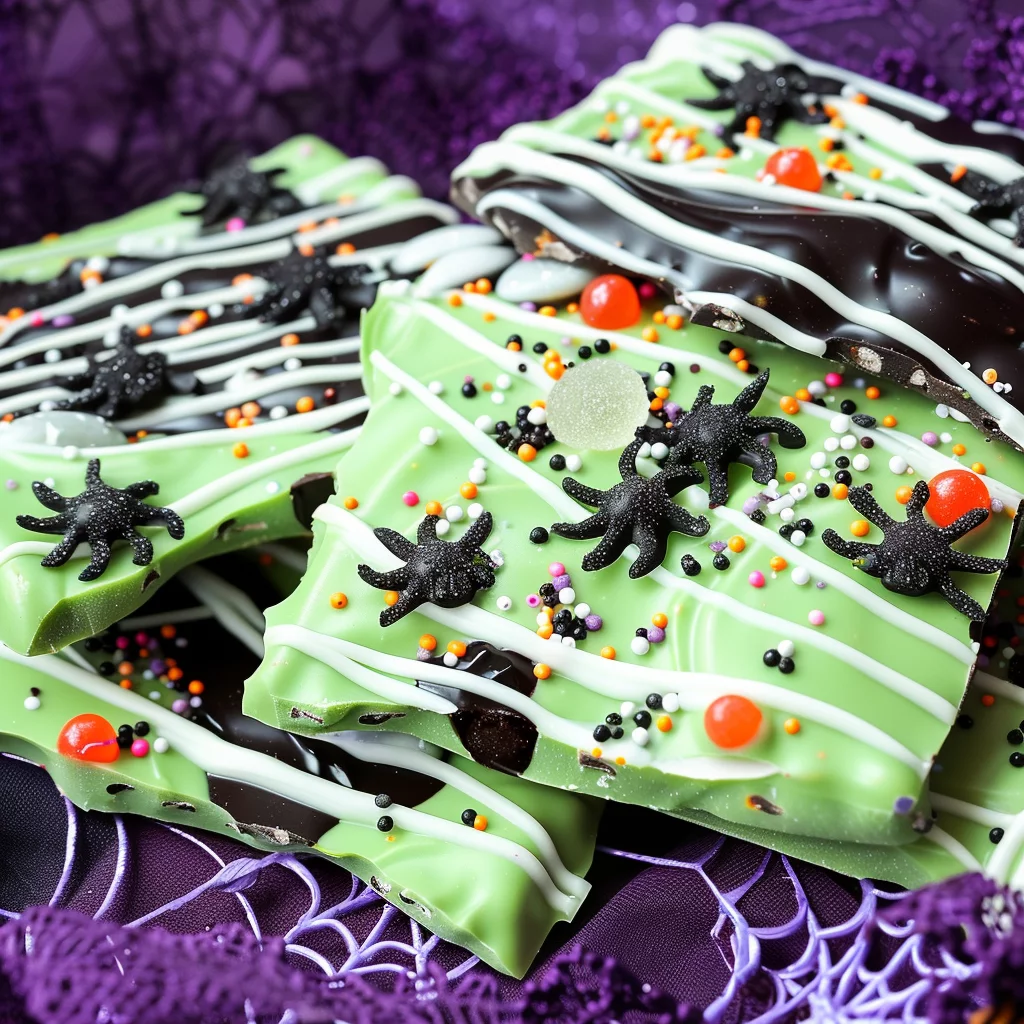
Once your green candy melts are smooth, spread the mixture evenly over the wax paper-lined baking tray. This layer should be thin enough to easily break into pieces once set. Quickly place the gummy spiders on top, ensuring they are spaced out to make breaking the bark into individual pieces straightforward. Using about six spiders for a single batch will yield the best results.
In a separate bowl, melt a small amount of red candy melts. This process is similar to the green melts, taking 30-45 seconds with stirring in between. Use a toothpick to apply the red candy melts to each spider, mimicking the iconic black widow marking. This small detail transforms each piece of the bark into a mini masterpiece.
Black Widow Chocolate Bark
Tips/tricks
Achieving a smooth texture in your candy melts is essential for the perfect bark. If your melts are too thick, don’t hesitate to use EZ Thins. They work wonders in creating a more fluid consistency. Additionally, when placing the gummy spiders, think about the eventual size of the bark pieces to ensure each one has its own spider.
For a more dramatic effect, consider adding a few drops of red candy melts around the spiders to create a ‘blood’ effect. This simple addition amplifies the Halloween theme and makes each piece of bark stand out. Remember to work quickly while the candy is still warm to ensure all decorations stick well.
Mastering Your Black Widow Chocolate Bark
Perfecting results
Once the spiders and red accents are in place, move on to the white candy melts. Melt them in a small microwave-safe bowl, stirring until smooth. Use the back of a spoon to drizzle the white candy melts over the green bark and spiders, creating a web-like effect. This final touch adds depth and texture to the bark.
Before the candy sets, sprinkle the Halloween-themed decorations over the surface. The additional textures and colors contribute to the festive appearance. Allow the candy to set at room temperature for a few hours. Alternatively, you can speed up the process by chilling the tray in the fridge or freezer for 10-15 minutes until firm.
Troubleshooting/variations
If you encounter issues with the candy melts seizing, ensure you are stirring adequately between heating intervals. If the bark isn’t setting properly, verify that the candy melts were fully melted before spreading. If you desire different variations, consider using different colored candy melts or adding edible glitter for a shimmering effect.
For those seeking more culinary inspiration, explore our Ghostly White Chocolate Bark or try crafting Spooky Spider Chocolate Truffles. Each recipe offers a unique twist on classic flavors, perfect for any Halloween gathering.
Serving and Storing Your Spooky Creation
Serving/presentation
Once the Black Widow Chocolate Bark is fully set, use a knife to cut it into pieces. Each piece should have a gummy spider for maximum effect. Arrange the pieces on a platter for a dramatic centerpiece at your Halloween party. The vivid colors and eerie theme make it a conversation starter among guests.
For a more curated Halloween spread, pair this delightful treat with Black Cat Cupcakes and perhaps a Spicy Black Bean Soup. These combinations ensure a flavorful and festive celebration that caters to both sweet and savory palates.
Black Widow Chocolate Bark
Pairings/storage
Store any leftover bark in an airtight container to maintain freshness. When stored at room temperature, it should remain crisp and delicious for several days. For extended storage, consider refrigerating the bark, which will keep it fresh for up to a week.
If you’re looking to complement your Black Widow Chocolate Bark with other culinary delights, explore these Blackberry and Bacon Venison Burgers with Creamy Brie or a refreshing Sous Vide Chicken Salad Bowl. These dishes offer a delightful range of flavors that pair beautifully with the sweet and spooky bark.
Conclusion
The Black Widow Chocolate Bark is a delightful blend of creativity and flavor, perfect for Halloween celebrations or simply adding a spooky twist to dessert time. This recipe not only serves as a fun activity but also creates a visually stunning treat that’s sure to impress. The combination of candy melts, gummy spiders, and festive sprinkles results in a deliciously eerie creation.
Whether you’re hosting a Halloween party or just indulging your sweet tooth, this bark offers a delightful experience. Its vibrant colors and unique presentation make it a standout addition to any dessert table. By following the steps outlined, you can easily craft this spooky treat and add a special touch to your celebrations.
