
📑 Table of Contents ▶
Authentic Mexican Gorditas Recipe
Crafting an authentic Mexican gordita teaches you the beauty of simple ingredients coming together to create something extraordinary. Growing up in a kitchen filled with the sounds of sizzling and the aroma of freshly made tortillas, I often found myself watching my grandmother whip up dishes that filled our home with warmth and joy. Gorditas, in particular, hold a special place in my heart. They represent the unity of family gatherings, where laughter and delicious food bring everyone together.
Each evening, the anticipation grew as she prepared the masa dough, effortlessly kneading it until it became soft and pliable. The thrill of watching her create perfect little discs, followed by the crackling sound of frying in hot oil, left me mesmerized. Soon enough, the gorditas transformed from mere dough into golden brown delights. As we savored them stuffed with tasty fillings, the experience became forever etched in my memory.
Now, I’m excited to share this authentic Mexican gorditas recipe with you. With just a handful of ingredients, you too can create these flavorful treats, perfect for any occasion.
Preparing Delicious Gorditas
Fundamentals
Authentic Mexican gorditas are a staple in many households, providing a strong foundation for diverse fillings. Making these fluffy, thick corn tortillas starts with a few essential ingredients. The primary element, masa harina, brings rich flavor and a pleasing texture. Combining it with warm water and salt creates the dough that makes the gorditas so delightful.
As you prepare, remember the importance of the kneading process. Kneading transforms the mixture into a pliable dough. Once your dough is ready, you will shape it into discs that fry beautifully to create tantalizing pockets perfect for filling.
Preparation/setup
Start by gathering your essential tools. You’ll need a large mixing bowl for the dough, a skillet for frying, and some parchment paper or a clean surface for rolling out the gorditas. Having everything within reach makes the process smooth and efficient.
Warm water is crucial, so consider heating it to a comfortable temperature for mixing. Make sure to measure out your masa harina and salt accurately. Keeping these fundamentals in mind will help ensure your gorditas turn out perfectly each time.
Ingredients
- 2 cups masa harina
- 1 1/2 cups warm water
- 1 teaspoon salt
- 2 tablespoons vegetable oil, plus more for frying
- 2 cups shredded chicken or beef
- 1 onion, diced
- 1 cup chopped fresh cilantro
- Lime wedges, for serving
Directions
- In a large bowl, combine the masa harina, warm water, salt, and 2 tablespoons of vegetable oil. Knead the mixture until a soft, pliable dough forms.
- Divide the dough into 12 equal pieces and roll each piece into a small, round disc, about 1/4 inch thick.
- In a large skillet, heat 1/2 inch of vegetable oil over medium-high heat.
- Fry the gorditas in batches for 2-3 minutes per side, or until golden brown and crispy.
- Drain the fried gorditas on a paper towel-lined plate.
- To serve, cut each gordita in half and fill with the shredded chicken or beef, diced onions, and chopped cilantro. Squeeze fresh lime juice over the top.

Mastering Gordita Techniques
Technique
Creating the perfect gorditas requires a bit of technique. Focus on achieving the right thickness when rolling out your dough. Aim for a consistent 1/4 inch, as this allows for even cooking while providing enough space to hold your delicious filling.
When frying, manage the oil temperature carefully. Too hot, and the outside will brown quickly while the inside remains raw; too low, and the gorditas will absorb excess oil. Aim for a gentle sizzle when you place them in the skillet—this indicates the oil is just right.
Tips/tricks
Experiment with different fillings beyond just chicken or beef. Vegetables, beans, or various cheeses can elevate your gordita game. Be adventurous and mix different flavors until you find your favorite combinations.
To save time, consider making a batch of dough ahead of time. You can store it in the fridge for a day or even freeze it for later use. Just remember to let it warm up at room temperature before rolling out.
Perfecting Your Gorditas
Perfecting results
Achieving consistently perfect gorditas often comes down to practice. If you find the texture too crumbly or dry, adjust the water slightly until you reach a pliable consistency. Each brand of masa harina may react differently, so trust your instincts and adapt as necessary.
Don’t fear imperfections! A slightly uneven shape can add character, showcasing the homemade quality of your dish. As long as they taste fantastic, they will be a hit regardless of their appearance.
Troubleshooting/variations
If you encounter issues with your gorditas puffing up too much while frying, it can signal that the dough is either too wet or the discs are rolled out too thin. Address this by adjusting your water or rolling technique. On the flip side, if they seem dense, you may need to knead the dough longer or let it rest briefly before frying.
You can also try cooking them on a griddle or comal if you want a smoky flavor without frying. This method allows for a healthier option while enjoying the classic gordita.
Serving and Storing Gorditas
Serving/presentation
Serve your gorditas warm and freshly filled. Create a vibrant platter with lime wedges and extra cilantro for a beautiful presentation. This delightful addition allows everyone to personalize their dish, bringing enhanced brightness to each bite.
Consider adding salsa or avocado slices alongside your gorditas for added richness and flavor. Your dining experience will not only be delicious but also visually appealing.
Pairings/storage
Pair your gorditas with a refreshing salad or a side of rice to complete the meal. If you find yourself with leftovers, store the unfilled gorditas in an airtight container in the fridge. They can easily be reheated in a skillet or microwave for subsequent meals.
Filled gorditas can also be stored in the refrigerator, although they are best enjoyed freshly prepared. Refill and enjoy them again or get creative with new fillings, making each meal a unique experience.
The journey of crafting authentic Mexican gorditas showcases the heart of cooking—simple ingredients transformed into cherished meals. With practice, you will master this delightful dish, allowing you to share the joy with those you love. Enjoy the flavors, textures, and memories that come with each bite.
Print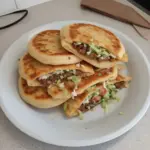
Authentic Mexican Gorditas
- Prep Time: 15 minutes
- Cook Time: 15 minutes
- Total Time: 30 minutes
- Yield: 12 servings
- Category: Main Course
- Method: Frying
- Cuisine: Mexican
- Diet: None
Description
Authentic Mexican gorditas are thick corn tortillas that serve as delicious pockets for various fillings, perfect for any occasion and filled with rich flavor.
Ingredients
- 2 cups masa harina
- 1 1/2 cups warm water
- 1 teaspoon salt
- 2 tablespoons vegetable oil, plus more for frying
- 2 cups shredded chicken or beef
- 1 onion, diced
- 1 cup chopped fresh cilantro
- Lime wedges, for serving
Instructions
- Combine the masa harina, warm water, salt, and 2 tablespoons of vegetable oil in a large bowl.
- Knead the mixture until a soft, pliable dough forms.
- Divide the dough into 12 equal pieces and roll each piece into a small, round disc, about 1/4 inch thick.
- Heat 1/2 inch of vegetable oil in a large skillet over medium-high heat.
- Fry the gorditas in batches for 2-3 minutes per side, or until golden brown and crispy.
- Drain the fried gorditas on a paper towel-lined plate.
- Cut each gordita in half and fill with the shredded chicken or beef, diced onions, and chopped cilantro.
- Squeeze fresh lime juice over the top before serving.
Notes
Experiment with different fillings like vegetables, beans, or various cheeses. The dough can be made ahead of time and stored in the fridge or freezer.
