
📑 Table of Contents ▶
Crispy Chicken Wrap
The joy of cooking a delicious meal often sparks from unforgettable moments in the kitchen. Picture a busy weeknight, the air filled with the aroma of spices, and laughter echoing across the room. Preparing a crispy chicken wrap brings back memories of entertaining friends with food that warms the heart. It’s simple, yet crowd-pleasing.
Crafting the perfect crispy chicken wrap transforms routine dining into a memorable occasion. Every bite offers a delightful crunch and a burst of wholesome flavors. With just a handful of ingredients, you can create a satisfying meal that fits any season—whether it’s an after-school snack or a vibrant addition to a picnic. Each layer offers a balance of textures and tastes that keeps the experience engaging.
Bringing together seasoned chicken, fresh greens, and creamy sauces makes these wraps a culinary canvas waiting for your personal touch. These wraps are adaptable; whether you prefer spicy or mild flavors, there’s room to customize with every wrap. With the right technique, you can turn even the simplest ingredients into a beloved family dish. Let’s dive deeper into making these crispy chicken wraps a staple in your kitchen!
Crispy Chicken Wrap Essentials
Fundamentals
Understanding the basics of your crispy chicken wrap is essential for crafting a tasty meal. The chicken, seasoned with smoked paprika, creates a robust flavor profile that stands strongly against the fresh salad greens and tomatoes. A simple breading technique gives the chicken its crispiness, making the wraps satisfying to eat.
The choice of tortillas or wraps is equally important. Flour tortillas provide a soft, malleable base for your wrap while adding a touch of flavor. The combination of warm, crispy chicken with cool salad greens enhances the overall eating experience, creating a delightful contrast for the taste buds.
The crispy chicken wrap is not only nourishing but also looks appealing on the plate. The vibrant colors of mixed salad greens and the juicy, red tomatoes make this dish visually striking. Plus, adding shredded cheese introduces a creamy element that can elevate the wrap to new heights.
Preparation/Setup
Starting with preparation can streamline the process and ensure everything comes together smoothly. Preheat your oven to 400°F (200°C), setting the stage for perfectly baked chicken that’s crispy on the outside and tender on the inside. Station your ingredients in an organized manner to facilitate a smooth cooking experience.
Begin by seasoning the chicken breasts generously with smoked paprika, salt, and pepper. This simple seasoning transforms each piece into a flavorful delight. Next, prepare your breadcrumbs, which will create the satisfying crunch once baked. This method ensures an even coating on the chicken, promising a crispy finish.
Have your tortillas warmed and ready for assembly. This step can be done in a skillet or microwave, making the tortillas pliable for rolling. The warmth enhances the overall flavor, creating a fulfilling wrap that you can customize to your liking!
Ingredients
Gather the following ingredients to create your crispy chicken wrap:
- 2 chicken breasts
- 2 tablespoons smoked paprika
- 1 cup breadcrumbs
- 4 large tortillas or wraps
- 1 cup mixed salad greens
- 1 cup sliced tomatoes
- 1/2 cup shredded cheese (optional)
- 1/2 cup your favorite wrap sauce (e.g., ranch, honey mustard)
- Salt and pepper to taste
These ingredients come together to form a delightful meal that suits any occasion. Each component offers a distinct flavor and texture that creates a well-rounded dish. The inclusion of salad greens and tomatoes adds a nutritious touch to the crispy chicken wraps, making it a complete meal.
Directions
- Preheat your oven to 400°F (200°C).
- Season the chicken breasts with smoked paprika, salt, and pepper.
- Dip the seasoned chicken into the breadcrumbs, coating evenly.
- Place the coated chicken on a baking sheet and bake for 20-25 minutes until cooked through and crispy.
- Warm the tortillas in a skillet or microwave.
- Assemble the wraps by layering salad greens, tomatoes, baked chicken, cheese (if using), and drizzle with your chosen wrap sauce.
- Roll up the tortillas tightly, slice in half, and serve.

Elevating Your Crispy Chicken Wrap
Technique
The technique you use is pivotal for achieving delicious crispy chicken wraps. Baking the chicken rather than frying not only makes for a healthier option but also retains the moisture within the breasts. The smoked paprika not only flavors the chicken but also adds a beautiful color, making your dish visually appealing.
Ensure that the breadcrumbs adhere well to the seasoned chicken. A little patience during this step ensures a crispy exterior that contrasts wonderfully against the tenderness of the chicken. An even layer of breadcrumbs helps prevent sogginess, leading to that perfect crunch when you take your first bite.
Tortilla handling also plays a crucial role in how the wrap comes together. Warm tortillas are easier to roll, allowing the ingredients to stay neatly contained. The result is a wrap that holds its shape and is easy to enjoy on the go or at home.
Tips/Tricks
Maximizing flavor can be achieved through a few simple tricks. Experiment by adjusting the seasoning levels according to your preference, and don’t hesitate to play with different wrap sauces to complement the chicken. The choice of sauce can dramatically change the profile of your crispy chicken wraps.
Using fresh, high-quality ingredients significantly enhances the overall taste. Crisp salad greens and ripe tomatoes bring freshness, providing a contrast to the seasoned chicken. The optional shredded cheese, if added, should be your favorite variety. Melted cheese envelops the chicken, making each bite more indulgent.
Consider varying your wrap fillings with seasonal vegetables or other favorites. Sliced avocado, roasted bell peppers, or even pickled jalapeños can add unique flavors. Don’t shy away from customizing each wrap to suit the palate of your family and friends!
Perfecting Your Chicken Wrap Experience
Perfecting Results
Achieving perfectly crispy chicken wraps comes down to attention to detail. Monitor the baking time closely to avoid overcooking the chicken, which can lead to dryness. Aim for a juicy interior complemented by an outer layer that’s crispy and flavorful.
For additional crispiness, consider placing the chicken under the broiler for the last few minutes. This technique enhances the crisp factor without drying out the meat. Alternatively, if you prefer that extra crunch, frying the chicken on the stovetop is another method that can yield fantastic results, but it may increase the meal’s fat content.
Taste-testing your layered ingredients before rolling up your wraps is vital. Adjust the assembly according to your preferences, ensuring that each ingredient shines through in the final dish.
Troubleshooting/Variations
Sometimes, despite your best efforts, things may not go as planned. If your chicken lacks crispiness, check the breadcrumb coating and consider a spray of oil before baking. This additional step can help achieve that golden brown look.
Embrace variations as well. If chicken isn’t available, try substituting with turkey or a plant-based protein. Your wraps can still deliver on flavor while catering to different dietary preferences. There’s no limit to the customization available; exploring new ingredient combinations keeps mealtime vibrant and exciting!
Serving and Enjoying Your Crispy Chicken Wrap
Serving/Presentation
Presenting your crispy chicken wrap can elevate the dining experience. Consider using a light, contrasting plate that highlights the vibrant colors of the salad and chicken. Slicing each wrap in half showcases the beautiful layers and creates a visually striking display.
Pairing the wraps with a side of fresh fruit or a light potato salad can complement the meal beautifully. The goal is to create a cohesive presentation that encourages enjoyment and engagement at the dining table.
Pairings/Storage
While pairing with beverages is a common practice, focus instead on suitable food accompaniments. A side of homemade fries, grilled vegetables, or a refreshing coleslaw can enhance your meal. Fresh fruit offers a delightful contrast to the crispy wraps and keeps the meal balanced.
For storage, tightly wrap any leftover crispy chicken wraps in foil or airtight containers, ensuring they maintain freshness. Enjoy your wraps within 3-4 days, reheating them to restore some crispy texture, if needed.
Storing the individual components separately keeps the texture intact, ensuring you can build delicious wraps again without losing quality. This approach provides a quick meal option without the need for extensive preparation.
The crispy chicken wrap embodies the spirit of joyful cooking and sharing. Each layer reflects the care put into crafting flavors that resonate with family and friends. With just a few ingredients, you can turn ordinary moments into something special.
Print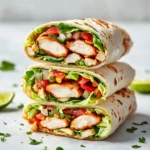
Crispy Chicken Wrap
- Prep Time: 15 minutes
- Cook Time: 25 minutes
- Total Time: 40 minutes
- Yield: 4 servings
- Category: Main Course
- Method: Baking
- Cuisine: American
- Diet: None
Description
A delicious and customizable crispy chicken wrap filled with seasoned chicken, fresh greens, and your favorite sauce.
Ingredients
- 2 chicken breasts
- 2 tablespoons smoked paprika
- 1 cup breadcrumbs
- 4 large tortillas or wraps
- 1 cup mixed salad greens
- 1 cup sliced tomatoes
- 1/2 cup shredded cheese (optional)
- 1/2 cup your favorite wrap sauce (e.g., ranch, honey mustard)
- Salt and pepper to taste
Instructions
- Preheat your oven to 400°F (200°C).
- Season the chicken breasts with smoked paprika, salt, and pepper.
- Dip the seasoned chicken into the breadcrumbs, coating evenly.
- Place the coated chicken on a baking sheet and bake for 20-25 minutes until cooked through and crispy.
- Warm the tortillas in a skillet or microwave.
- Assemble the wraps by layering salad greens, tomatoes, baked chicken, cheese (if using), and drizzle with your chosen wrap sauce.
- Roll up the tortillas tightly, slice in half, and serve.
Notes
For extra crispiness, consider placing the chicken under the broiler for the last few minutes.
